Installation Manual EM-2D Version 3.0 April 1999
System Description
SDS EM-2D is a microprocessor based, digital, programmable EFI system intended to control
port type injectors. EM-2 allows you to access all points in the engine operating map with the
engine running and alter them according to your own specific needs utilizing a hand-held LCD
programming box. As such, the system can be used on virtually any engine type or displacement.
Please read the entire manual before attempting any hookup or running of the system. If
you are installing an E or F system, you will need to refer to the supplemental manuals for those
systems.
Theory of Operation
Air temperature, water temperature, manifold pressure, throttle position and rpm are all
measured and taken into account by the ECU which determines how often and how long the
injectors remain open. The ECU generates a precise triggering pulse which is fed to the injector
driver to open the injectors. The manifold pressure or throttle position value multiplied by the
rpm value determines the primary pulse width.
Fuel System
In order for any EFI system to function properly, an adequate supply of fuel at the proper
pressure must be present at the injectors. This cannot be overstressed. Problems are
invariably blamed on the electronics when in fact 99% of all running problems are due to
mechanical deficiencies.
Vehicles with Factory EFI
If horsepower is similar to factory outputs, fuel tanks, pumps, lines and injectors should be
adequate when installing EM-2. When increased power is desired on factory equipped engines,
some or all of the fuel system components may have to be upgraded.
Vehicles without Factory EFI
We recommend that vehicles originally fitted with carburetors have a fuel system installed as
shown in the following schematic:
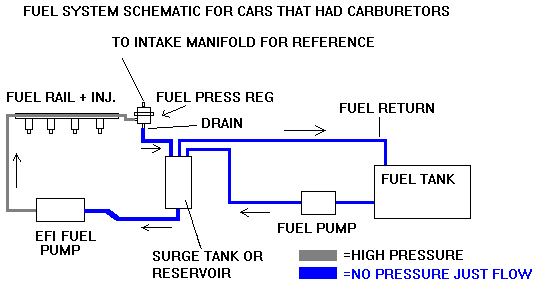
Two fuel pumps are required. One from the main fuel tank to the surge tank may be of the low
pressure variety but must be capable of keeping the surge tank full during full throttle operation.
Fuel lines should be at least 8mm (5/16 in.) ID on engines up to 400 hp and 10mm (3/8 in.) On
engines over 400 hp. The fuel injection pump must be adequate to supply full rated fuel flow at
maximum design pressure for a given output.
As a rule of thumb, on gasoline, you will require about 5.7cc per minute per hp so a 300 hp
engine would burn about 1710cc per minute. (300 X 5.7). On alcohol, double these figures.
Injectors must also be capable of flowing adequate amounts. Total fuel flow divided by the
number of injectors fitted will give you the minimum flow rate needed from each injector. We
recommend running injectors to only 85% duty cycle. So, on a 4 cylinder engine with 300 hp, we
would calculate 1710 divided by 4 = 428. 428 divided by .85 = 504. An injector flowing at least
500cc per minute should be used for this application.
If you already know the injector flow rate, you can calculate the maximum safe hp available
with the following formula: injector flow rate in cc's per minute multiplied by the number of
injectors divided by 7 equals maximum hp at 85% duty cycle. Using the above example, 500 X 4
divided by 7 = 286 hp.
New fuel lines may be run using rigid steel, copper or aluminum tubing. Flexible lines must be
medium pressure hose intended for fuel injected applications. Working pressures can exceed 60
psi on turbocharged engines.
Fuel pressure regulators vary the fuel pressure according to manifold pressure. Fuel pressure at
idle on most engines should be 2 to 2.7 Bar (30 to 40 psi on most engines. Wide open fuel
pressure on naturally aspirated engines should be 2.3 to 3.0 Bar (35 to 45 psi). Fuel pressure on
turbocharged engines should be around 2.5 Bar (35 psi) plus boost pressure.
Excess fuel not burned by the engine is returned through the regulator back through the surge
tank, then back to the fuel tank. A fuel return line back to the tank is required.
The surge tank should always be mounted above the main EFI pump inlet so that fuel may
gravity feed into this pump. Surge tanks ensure that the fuel supply will not be interrupted by air
entering the system under high G situations. Fuel injected engines will not run properly with air
in the system.
System Hookup and Mounting
Connect each component according to the schematic below. Most separate wires are marked
and those with Weatherpack plugs are self-evident with regards to connection. Separate wire
connections are as follows: Green to negative coil terminal or tachometer lead. Keep the green
wire as far as possible from ignition wires. Red to battery positive or switched 12 volt source. If
hooked to ignition switch, be sure that there is power in the circuit when the key is in the start
position. Black wire on main harness to chassis ground. Short black wire on injector driver to
chassis ground. Red wire(s) on injector harness to switched 12 volts positive. Grey wire to O2
sensor if used. Optional orange wire to fuel pump relay. Optional light blue wire to fast idle
relay. Optional purple wire to RPM SWITCH relay. Note 4 cylinder injector harnesses have a
single power wire while all others will have 2. For E and F systems, consult the appropriate
manual supplement for additional wire hookups.
A 1 amp fuse should be placed in line with the ECU red power wire. Note if ECU power is
obtained directly from the battery, a switch should be placed in line to prevent the battery from
being run down over time. Ensure that all connections to ground have proper metal to metal
contact.
All wiring connections in the engine compartment should be supported in such a way as to
prevent vibration from working directly on the wires, sensors and connector plugs. Tie wraps
should be used for this purpose. Never run wires through jagged firewall holes unless a grommet
is used. Keep all wires and especially the green tach wire on D systems and the Hall cables
on E and F systems, as far from the ignition components and hot points as possible.
ECU /Driver Mounting
The ECU must be mounted in a moisture free location inside the vehicle. Use the mounting
tabs to secure it to the chassis. The ECU should be mounted at least 3 feet away from the
ignition coil and wires if possible, preferably behind a metal firewall.
The injector driver box should also be mounted inside the vehicle in a moisture free area on
the injector side to minimize wiring problems. It is important to mount the driver so that it
can properly dissipate the heat generated. Never wrap the driver in foam or place in a
confined space without air circulation.
Temperature Sensor Mounting
The water and air temperature sensors both utilize 3/8 NP threads. The water temp sensor
should be screwed into the cylinder head so that it can read water temperature during warmup
INDEPENDENT of the water controller by the thermostat. Note air cooled engines are fitted
with a cylinder head temp sensor for warmup enrichment. Thread size is metric 10 X 1.0mm.
This is connected to the white wire on the main harness.
The air temp sensor should be placed in the intake manifold or induction pipes after any
intercoolers which may be fitted.
Air and water temperature sensors may be fitted to your engine using either adapter bushings
into the original sensor bosses or by drilling a hole into a suitably thick area in the intake
manifold for the air temp or the cylinder head or thermostat housing in the case of water temp
sensor.
If drilling into an area, be sure to check that the wires from the sensor will clear things like
pulleys and exhaust pipes and that drilling will not damage anything underneath. The area
should be a minimum of 5mm (.200 in.) thick and should be pilot drilled before final drilling
with a 37/64 drill. Both sensors use 3/8 NP threads which are tapered threads. When tapping, be
careful not to go too deep or the sensor will not tighten properly. The sensor should thread into
the hole half to three quarters of the way in with mild pressure.
Be sure to clean out all chips from the drilling and tapping operations before installing the
sensors. Two or three wraps of teflon tape should be used on the final assembly. Sensors should
be tightened until snug with a short wrench. A wire tie should always be used to secure sensor
cables to prevent vibration breakages.
Map Sensor Mounting
The MAP sensor if used should be mounted in a moisture free area close to the intake
manifold and connected using a length of 3mm (1/8 in.) Vacuum hose to the intake manifold
DOWNSTREAM of the throttle body. Always try to mount the MAP sensor with the vacuum
port facing down. The placement of a .025 to .035 inch orifice in the vacuum hose may be
required on some installations to reduce MAP fluctuations
Throttle Position Sensor
Systems not using a MAP sensor rely on the TPS for both acceleration enrichment and load
sensing. The TPS is used on ALL systems to supply accelerator pump information to the
ECU. EM-2 systems are not supplied with a TPS as standard. Your stock TPS may be used if it
is of the potentiometer type. Most cars made after 1984 use a potentiometer type TPS.
Spare pins and a plug will be supplied with your system to allow grafting onto your stock TPS
wiring. You can cut your stock TPS wires a few inches behind the plug and crimp on the 3 pins
to the 3 wires used. Snap the pins into the supplied plug as outlined in the next section.
If you have ordered the optional TPS kit, your wiring harness will already have the 3 pins
crimped onto the TPS cable. There are 2 different TPS's. One is identified by a grey top and
drive is for clockwise opening throttles. The other has a black top and is for counter clockwise
opening throttles. Make certain that you have the proper TPS for your installation.
You can check this by holding your throttle body with the shaft end which you intend to mount
the TPS on facing you, then open the throttle. If the shaft rotates clockwise, you need the grey
TPS. IF it opens counterclockwise, you need the black version. The pins are plugged into the 2
TPS's differently: The TPS plug has the numbers 1,2 and 3 stamped into it on the top, back face.
Grey TPS's are wired as follows: pin 1- red, pin 2- white, pin 3- black. Black TPS's - pin 1 -
black, pin 2- white, pin 3- red. Pins are snapped into the back on the plug then the blue pin lock
is slid back towards the pins so that it is flush with the black plug face. Be sure that the pins
are in the correct hole before snapping in place as they are impossible to remove once
inserted. Both TPS's feature identical 5/16 D type drives to fit most popular import throttle
bodies. Mounting may be accomplished with an aluminum adapter plate bolted to your throttle
body. Be sure that the plate is of the correct thickness to ensure that the throttle shaft will not
bottom out and cause binding.
Using OEM Throttle Position Sensors
Many engines are already equipped with an SDS compatible TPS. Your system has included a
3 pin plug and 3 snap-in pins to plug into the main wiring harness plug labeled TPS. Not all
TPS's are compatible with SDS, many are switches and not potentiometers. The SDS unit must
use a potentiometer type TPS connected to the ECU for acceleration enrichment. The following
procedure to determine correct wire hookups should only be attempted by people who know how
to use an ohmeter and understand basic electronic theory.
Incorrect hookup of the TPS wires to the wiring harness can seriously damage the ECU
and TPS. This damage is not covered under warranty.
The following applies to 3 pin TPS's:
Make sure that the TPS is mounted on the throttle body as it would be in normal operation. Set
the ohmeter on the 100K ohm range. Place meter leads on TPS pins. Rotate throttle shaft and
shuffle leads between the TPS pins until you see a constant resistance reading between two pins
which does not change as the throttle is rotated. These 2 pins will be called the OUTER pins for
now. The remaining pin will be called the CENTER pin. The center pin will be connected to the
white or green wire ( pin 2) on the wiring harness plug marked TPS. Connect one meter lead to
the CENTER pin and the other lead to one of the OUTER pins. Open the throttle slowly. If the
resistance increases as the throttle is opened, this OUTER pin will connect to the black TPS
wire. The other OUTER pin will connect to the red wire on the TPS plug.
If the resistance decreases as the throttle is opened, then this OUTER pin will connect to the
red wire on the harness and the other OUTER will connect to the black wire on the harness.
On OEM TPS's with more than 3 pins, 3 of the pins may be for the potentiometer and the
remainder may be switch contacts. SDS does not use the switch contacts.
By shuffling meter leads to different pins on the TPS and opening and closing the throttle
while watching the meter, you can identify the pins that connect to any internal switches. The
switch or switches will most often share one pin with the potentiometer. Open and close the
throttle all the way while checking resistance. The resistance will change from zero to infinite or
vice versa as the throttle is moved. Once the 3 potentiometer pins have been found, the other
pins can be ignored.
To verify proper connections, power up the system and measure the voltage from the black to
center (white) wire. The voltage should increase as the throttle is opened. I Gauge 2 mode, in the
AP window you can verify proper TPS hookup by opening the throttle rapidly and watching the
AP value. The value should go up to 10-30 for a half second or so then tumble back to zero
within 1.5 seconds.
Ignition Wires, and Interference Problems
Always use radio suppression type spark plug wires. NEVER use solid core wires. We
recommend Magnecor or NGK. Try to mount the ECU as far from the ignition system as
possible. Ignition interference problems usually show up as gibberish or strange symbology in
the programmer screen. It is also not a good idea to route any of the SDS wiring near the ignition
system. This is especially important on Hall sensor cables (E and F system).
LCD Programmer
The programmer allows you to access all points within each parameter. When powered up,
SDS EFI should appear in the LCD window. From here, parameters may be called up by pressing
the right or left parameter select buttons (< or >). As each parameter is gone through, the next
parameter will appear in the window. Parameters will appear in the following order from left to
right: GAUGE, GAUGE 2, MAGNET SEEN/NOT SEEN (E,F units only), RPM SWITCH,
SPARE 1-2, VALUES LOCK, CLOSE LOOP ON, OFF, CL LO RPM LIMIT, CL HI RPM
LIMIT, CL MAP LO, CL MAP HI, KNOCK RETARD (E,F only), MAGNET POSITION (E,F
only), AIR TEMP, START, RPM IGN (E,F only), IGN RET/MAN PRESS (E,F only), ENGINE
TEMP, MANIFOLD PRESS or TP, RPM FUEL, ACC PUMP LO, ACC PUMP HI then, back to GAUGE.
The parameters will automatically loop back to the opposite end upon reaching one of the end
selections. By holding down either the right or left parameter select buttons for more than 2
seconds, ranges will advance at the rate of 8 per second until the button is released at the
desired location.
Within each parameter, there are a number of ranges with a corresponding value number
beside it. This value number is the one that will be changed to alter the injector pulse width. IE.
RPM FUEL 5250 57. RPM FUEL is the parameter, 5250 is the range and 57 is the value. The
value number may be any number between 0 and 255. The larger the number, the more fuel
will be injected at that parameter and range. By pressing any of the + or - buttons while a
parameter is selected in the window will change the value. Don't play with these unless you
want to change the value.
To change a value, use one of the 4 buttons labeled +1, +10, -1, -10. Each button will change
the value in the window each time it is depressed by that amount. IE. With a 57 in the window,
hitting the -10 button once will change the value to 47. The +10 and -10 buttons should only be
used for quick, radical adjustments. Again, by holding down these buttons for more than 2
seconds, values may be changed quickly to the desired figure. For GAUGE MODE operation,
see that heading. The VALUES LOCK feature must be selected off in order to program.
RPM (RPM FUEL)
The rpm band is divided into ranges, usually 250 rpm apart. These values should usually be
fairly close to each other varying only with the torque curve of the engine. It is important to
note that the number of injections are doubled when the rpm is doubled regardless of the
values entered.
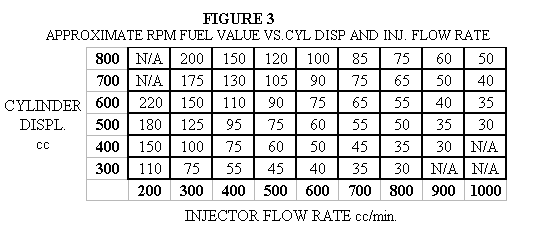
As a starting point, refer to figure 3 to get an approximate RPM FUEL value to enter for your
engine. You will need your injector flow rate and engine displacement to use this chart. Injector
flow rate is in cc's per minute. If your flow rate is in pounds per hour, multiply by 10 to convert
to cc's per minute. For example a 30lb./hr. injector would convert to roughly 300cc/min. Take
your engine displacement and divide by the number of cylinders to get your displacement per
cylinder. Cross your injector flow rate with your displacement per cylinder to find your RPM
FUEL value. Enter this value right from idle rpm to redline rpm as a starting point. This chart is
applicable for gasoline. If you are using Methanol, double the fuel value in the box.
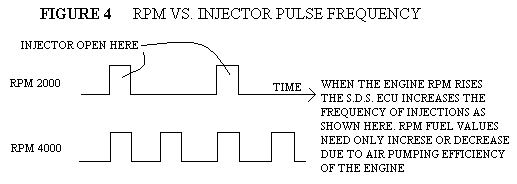
RPM values therefore only compensate for the volumetric efficiency or breathing differences
related to rpm. RPM values SHOULD NOT rapidly increase with increasing rpm on most
applications. See figure 4 for clarification.
Change the RPM value at whatever the engine rpm is at idle in Gauge 1 mode to obtain a smooth
idle before adjusting any MAP values.
Lower RPM values should rarely be less than 40 unless the engine is fitted with extremely
large injectors. The ECU multiplies MAP or TP value by the RPM value to arrive at the primary
pulse width. With this in mind, if you enter a 0 or 1 in either the MAP or RPM charts, when the
system crosses that point, it will shut off the fuel.
Each RPM FUEL value should be adjusted for best running at wide open throttle/low turbo
boost. Use caution at high throttle openings with severe stumbles. You can melt the pistons
if the mixture is too lean. Changing the values by 10's until a stumble disappears is the quickest
way to get the setup close. Values can be fine tuned later on. RPM values should follow the
torque curve of the engine. The highest value should appear at the torque peak rpm not the
power peak. See figure 4.
Often people have their RPM FUEL values very incorrect and then find themselves having to
reslope the entire 64 manifold pressure values, which can lead to further problems. When the
RPM FUEL values are setup correctly the majority of manifold pressure values can be left
unchanged, thus greatly simplifying tuning of the engine.
RPM values should follow the torque curve of the engine. The highest value should
appear at the torque peak rpm not the power peak. See figure 4.
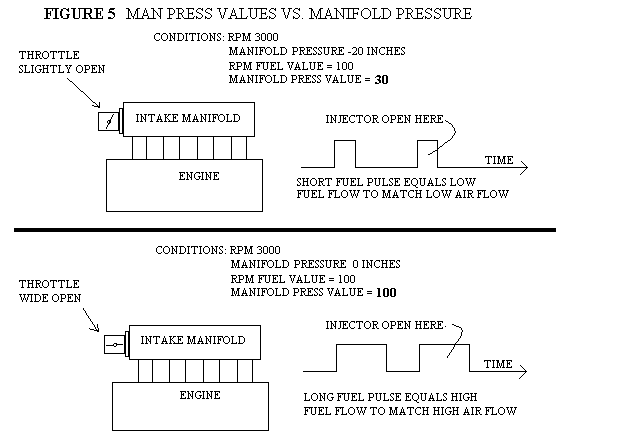
Manifold Pressure (MANIFOLD PRESS or MP)
Data in the manifold pressure chart determines the relationship between vacuum and boost and
the amount of fuel injected. Standard EM-2 systems have a negative sign preceding all vacuum
numbers in inches of mercury, all boost numbers are in psi and have no sign in front of them. All
units are pre-programmed with a standard MAP value chart depending on the MAP sensor used.
These values should be close, so most initial programming is usually done on the rpm values.
MAP values should increase roughly proportionally as MAP increases.
If the engine appears to be too rich everywhere, lower the RPM FUEL values across the
board. Do not start re-sloping the MAP values as this often leads to people getting way off
track.
Since idle mixture is difficult to pre-program, the user will almost certainly have to adjust the
values in this manifold pressure range. Most engines will idle between 10 and 20 inches of
vacuum so this is where the idle adjustments will be made. Idle MAP values work best by
having them in the range of 25-35. Initially, you should leave your idle MAP values as per
the standard MAP chart and only adjust the RPM Fuel values to obtain a smooth idle.
Select gauge mode to get an idea of what manifold pressure your engine is idling at. Select the
closest range to this MAP by using the parameter select buttons on the LCD programmer.
If the mixture knob is to the left of 12 o'clock at idle, the mixture is too rich so the value in the
window will have to be reduced by hitting the -1 or -10 buttons until the knob can be advanced
to the 12 o'clock position. Use caution at high throttle openings with severe stumbles. You
can melt the pistons if the mixture is too lean. Always go richer first with the knob to see if
the stumble gets worse. Return the knob to the 12 o'clock position before working on the next
range.
MAP values should increase in a reasonably linear fashion. They should not go up by one
or two per location then suddenly increase by 5 or 8 per location, except possibly at idle.
If you wish to shut the fuel off during deceleration, this can be accomplished by entering 1's at
the low vacuum numbers as seen in the example map. You cannot do this on TP systems. There
are 3 different MAP sensors used with the system which cover a different range of pressures.
The slope of the values will be different with different sensors.
If the idle speed is fluctuating up and down, move to the manifold pressure ranges just above
and below where the engine is idling at. Make slight adjustments here until the idle is smooth.
Idle MAP values often work best when the values are the same over the whole range of idle
MAP ranges (2-3 ranges). If the MAP fluctuates over more than 3 ranges at idle and you cannot
get a smooth idle, you may have to install a .025 to .035 inch orifice in the MAP sensor line.
Refer to figure 5 if you do not understand the MAP concept.
For setting cruise and higher power MAP values, the same procedure as above applies. Set the
programmer to Gauge 1 mode and increase MAP with the throttle until you identify a rich or
lean spot either with the mixture knob or mixture meter. For example let's assume that at -8.42
to -6.81 inches we have a slight stumble and the mixture meter reads very lean. We continue to
hold the throttle steady within this range while watching gauge 1 mode. Now, we turn the
mixture knob richer until the stumble is no longer evident. The knob is turned to around +12%
to make the engine run smooth. Now, we can go into the manifold pressure values to the ranges
spanning -8.42 to -6.81.We can bump these up from say 90 to around 100 to see if we have made
them rich enough. Remember to turn the knob back to its 12 o'clock or 0% position to verify
your change. This will have to be repeated at all MAP sites where the mixture is not right.
When programming, remember to change only one variable at a time. To hold MAP
constant, use a high gear and the brake or a hill to keep rpm from changing as you open the
throttle. Make the change then go back to gauge, reestablish the range that you were working on
and check the mixture again.
When using the mixture meter, most engines have to idle quite rich to be smooth. Under light
load cruising conditions, most engines can be run quite lean for good fuel economy. Under full
throttle and boost conditions, the mixture needs to be quite rich to produce maximum power and
suppress detonation. It is normal for the mixture meter to go full lean when the throttle is
released while in gear if 1's are entered in the high vacuum areas of the MAP ranges.
Throttle Position (TP or Throttle pos)
This section applies only to systems not using a MAP sensor. The TPS must be adjusted
properly to supply correct data to the ECU. To do this, first select gauge mode on the
programmer. In the top, left corner TP will appear followed by a 2 digit number between 0 and
64. These numbers refer to throttle plate position. With the throttle closed, rotate the sensor until
a number between 4 and 8 appears behind TP. The TPS should be tightened down at this point.
Each number or position will have a corresponding value number beside it between 0 and 255,
This value number determines the amount of fuel injected at that throttle position. Once the
engine is started, the value number corresponding to the closed throttle position should be
increased if the mixture knob is to the left of 12 o'clock or decreased if the knob is to the right
of 12 o'clock. The aim is for smooth running with the knob in the straight up position.
Values only have to be entered for the position numbers from closed to open throttle. TP
values should increase rapidly in the first 10 -20 numbers then slowly flatten out towards full
throttle. Idle TP values should be in the 25-35 range. TP values multiplied by the RPM values
result in the primary pulse width so the more air being admitted by the throttle plates, the
higher the corresponding TP value should be.
Acceleration Pump (ACC PUMP)
This function adds to the primary injector pulse width when the throttle is rapidly opened.
There are 3 adjustments to make for the acceleration pump. Two adjustments are made with the
programmer and the other one is done with the trimmer potentiometer in the ECU accessed
through the ACC hole in the top cover.
The ACCPUMP LO RPM value controls action from 0 to 1875 rpm. The ACCPUMP HI RPM
setting controls action above 1875 rpm. Both parameters must have a proper value entered for
proper engine response.
To set this parameter properly, snap the throttle open quickly. If the engine hesitates, change
the value. If the hesitation is worse, you have changed the value the wrong way. Repeat this
procedure on both HI and LO settings until engine response is acceptable.
The trim pot in the ECU controls the sensitivity to slow throttle movements. This control is
very important just out of the idle range. Set this control by opening the throttle slowly from the
idle position. Adjust for the smoothest possible acceleration. The trim pot is normally between
11 and 2 o'clock. Do not turn the trim pot fully clockwise as this causes extreme sensitivity of
the circuit to randomly dump fuel into the engine resulting in rough running. Acc pump values
are generally between 10 and 50 on most applications.
If changing the values will not make the engine respond properly, check to make sure that the
TPS is hooked up correctly. You can check for proper pump operation by first selecting GAUGE
2 mode. With an ACCPUMP LO RPM value of 10 entered, you should see the AP number
increase from 0 to a higher number when the throttle is rapidly opened, then as the throttle
movement stops, the number should quickly return to 0. The AP number should always be 0
when the throttle is not moving. If not, it indicates an intermittent connection or a damaged TPS.
Start (START)
Start enrichment is provided for under the START parameter. The ECU takes its cues from the
water (or head temp) sensor and injects extra fuel for the first 256 injections after the ECU
detects crank rotation. This function is activated every time that the engine is started no matter
what the water temperature is. It is critical for proper starting, especially in cold climates.
The value entered at a particular START water temp determines how much will be added to
the primary pulse width to aid starting. Injector flow rates will have a large effect on these
values. Large injectors will require smaller values on the same engine compared to smaller
injectors.
At colder temperatures, the values are high, tapering off as the engine warms up. At temps
over 100 degrees F, most engines do not require much extra fuel so the values should be low
here although on some engines hot starting may be improved with some extra fuel to aid flushing
boiling fuel from the injectors. Experimentation is required for a satisfactory setup here.
Once the first 256 injections have occurred (3-7 seconds), the ECU reverts to Engine
temperature for warmup enrichment. These two parameters should not be confused.. The
START function is automatically reset after 2 seconds after the engine stops turning.
Engine Temperature (ENGINE TEMP, ET)
The value in this parameter determines the amount of extra fuel injected to compensate for a
cold engine during warmup. Liquid cooled engines use a water temp sensor and air cooled
engines use a cylinder head temp sensor to supply this info to the ECU. You should aim for a 0
value when the engine is at normal operating temperature. Most engines will not require extra
fuel after 100-120 degrees F. Temperatures can be displayed in F or C. The values should
decrease in a fairly linear fashion from cold to operating temperature then have 0's entered above
this threshold.
Some engines like a little additional fuel when hot starting to flush the injectors. Under heat
soak back conditions, this extra fuel will be added until water circulation brings the water
temperature below this threshold. If you are doing this be sure to only enter numbers above the
water temps which are in the normal operating range.
As a reference, a value of 127 would add 50% to the pulse width and a 255 entered will double
the pulse width.
By flicking back between gauge mode and water temp you can make adjustments while the
engine is warming up. Each time the ECU updates to a new ET in gauge mode, you can go to
that ENGINE TEMP in the window. Now turn the knob richer and leaner and note where the
engine starts to run rough on each side of 12 o'clock. If it runs rough say at 10 and 2 o'clock,
you probably have the water temp values about right. If not, adjust the ENGINE TEMP value at
the water temp displayed currently in gauge mode.
Temperature (AT or AIR TEMP)
The air temperature correction map is pre-programmed when delivered. It provides an absolute
density correction relating to cues from the air temperature sensor. This parameter should only
be adjusted when it can absolutely be determined that a change in induction temperature
causes the engine to run rough. AT is displayed in GAUGE mode.
On some engines, there is considerable heating of the induction air in the intake manifold,
especially on non-crossflow types. In these cases, it is important that the air temp sensor be
located close to the intake ports. If the sensor is placed too far away, the engine will tend to run
rich because the sensor is not reading the true temperature of the air entering the engine.
On turbocharged engines, the sensor should be located in a position where it will be wetted by
high velocity air after the intercooler. The wide range of temperatures that these engines operate
over dictate that the sensor detect changes as quickly as possible.
Heat soak-back after shut down or prolonged idling can cause starting and running problems.
Fuel can boil in the injectors and fuel rails making it virtually impossible to meter fuel
accurately. Don't blame these problems on the system. Changing the air temp sensor location
may help this problem. Be aware that conduction from water or exhaust heated manifolds may
give false air temperature readings.
Gauge Modes
Calling up the gauge modes allows you to see in real-time, the sensor inputs to the ECU. This
is useful for diagnosing sensor problems as well as programming. In gauge 1 mode (obtained by
pressing the gauge button once) the LCD screen displays RPM, manifold pressure, air
temperature and engine temperature simultaneously. If you encounter a strange problem or
stumble, always select the gauge modes first to see if everything makes logical sense. Most
problems can be quickly diagnosed here if you understand the system. The gauge button allows
quick access to the gauge mode and upon pressing the button again, return to the previous
parameter and range.
Gauge 2 mode can be accessed by pressing the right scrolling button (>) once when in gauge 1
mode. Gauge 2 displays mixture knob position, acceleration pump action, injector duty cycle and
ignition timing in degrees BTDC on E and F units only.
Closed Loop Feedback Control (CLOSE LP or CL)
EM-2 systems are equipped with closed loop mixture control capable of taking cues from an
oxygen sensor. In closed loop mode, the ECU attempts to hold the air/fuel ratio around
stoichiometric (14.7 to 1 AFR for gasoline). The O2 sensor sends a DC voltage to the ECU in
proportion to the free oxygen present in the exhaust stream.
If the sensor detects a lean condition, the ECU increases the injector pulse width to
compensate and vice versa. Since there is a delay time between sensing and correction, the air to
fuel ratio will continuously fluctuate slightly to either side of stoichiometry. This condition can
be seen when using a mixture meter for setup. Holding the mixture close to the stoichiometric
range is essential for the lowest possible emissions when the engine is fitted with a catalytic
converter. Closed loop operation is not possible with leaded fuels or on SDS systems using TP
for load sensing.
Many engines will not tolerate being idled at the relatively lean mixtures associated with
closed loop operation nor will they safely tolerate these lean mixtures at full throttle, therefore
the closed loop mode has rpm and manifold pressure limits, outside of which the ECU will
switch out of closed loop into open loop (programmed values) mode. The ECU will also switch
out of closed loop when the throttle is opened quickly. Closed loop will not be engaged by the
ECU until the engine temperature exceeds 35C (95F) and the sensor voltage first exceeds .625
volts. The rpm and MAP must also fall within the programmed limits.
The following limits are programmable: CL LO RPM LIMIT and HI which determine where
the ECU will discontinue closed loop control at. If you select 1500 and 4500 RPM respectively
in these slots, closed loop operation will be discontinued whenever the rpm goes above or below
these limits. The same thing applies for the manifold pressure limits, CL MAP LO and CL MAP
HI. The engine must operate within these 4 limits or the ECU will revert back to open loop.
CLOSED LOOP OFF can be selected if you wish to disable the feature. The grey wire must be
connected to an oxygen sensor and CLOSED LOOP ON must be selected to set the closed loop
function.
The O2 sensor will not supply reliable information to the ECU when cold (below 600 degrees
F). A 3 wire heated sensor will give better results over an unheated one. Software limits prevent
the ECU from adding or subtracting more than 25% to the primary pulse width in closed loop so
it is important that the open loop fuel values are reasonably close to correct for proper
functioning of the closed loop control.
Closed loop operation in most OE applications is generally limited to cruising conditions.
Never program in limits corresponding to high power, high rpm conditions. Severe engine
damage due to lean mixtures can result. A lean stumble is often apparent when the engine is
unhappy about running in closed loop. Limits should be set to avoid these conditions. A mixture
meter is highly recommended for system setup.
As stated before, many engines will not idle smoothly in closed loop mode. We recommend as
a rough guideline, setting the CL LO RPM LIMIT no lower than 1500 rpm and the CL HI RPM
LIMIT no higher than 70% of the redline rpm limit. Likewise, closed loop manifold pressure
limits should preclude the low vacuum idle conditions as well as the high throttle ones. Set the
CL MAP LO limit 3 to5 inches above the normal idle MAP value and the HI limit around -5
inches for naturally aspirated engines and from -5 to 2 psi boost on turbo/super charged engines.
In CLOSED LOOP ON/OFF mode, ON/OFF is selected with the +1 and -1 buttons. In the other
4 CL modes, the +1,-1 buttons are used to select the HI/LO points which will be in the same
graduations as your RPM and MAP ranges. Always leave the closed loop off if no O2 sensor is
connected and always leave closed loop off until all normal programming is completed.
Mixture Knob (KNOB)
The mixture knob controls the overall mixture across all ranges. In effect, it adds or subtracts a
percentage to the injector pulse width. From the straight up or 12 o'clock position, the mixture
can be leaned roughly 50% by turning the knob fully counter clockwise or 50% richer by turning
it fully clockwise.
The knob is very useful in determining a rich or lean condition. It is important to leave the
knob in its final position once programming is complete. Precise return of the knob to an exact
position can be noted in gauge 2 mode under KNOB. A +, 0 or -% indicates rich, neutral or lean
position. The knob may be disconnected if desired. This will leave the setting at 0% so it is
important to complete proper programming with the knob at 12 o'clock if the knob is to be
disconnected.
Disconnecting the LCD Programmer
The programmer may be disconnected when desired. We recommend that you place the
display in gauge 1 mode before unplugging the cord. It is also a good idea to shut off the engine
while doing this.
When re-connecting, the cord should be plugged back in, then the red reset button may have to
be pressed to reboot the programmer.
Setting Safety Limits
Overrev and overboost protection can be obtained by selecting the point of fuel cutoff on the
LCD programmer. If you wanted to shift at 7000 rpm, calling up RPM FUEL 7250 and entering
a 1 would not allow the engine to exceed 7125 rpm. Boost limits are entered in a similar fashion
by calling up the appropriate MAP range for fuel cutoff and entering a value of 1. We
recommend that you also enter a 1 in the next range up as sometimes the engine will run through
the first cutoff in the lower gears.
Theft protection can be obtained by entering a 1 at the lowest RPM FUEL range and removing
the programmer. To restart, you would have to re-enter the proper value at that point.
Startup Procedure
Make sure that fuel at the correct pressure is present at the injectors. Turn on ignition and
computer power. Crank engine, rotate mixture knob while cranking. If engine does not fire, see
troubleshooting section.
Once the engine is running, use the mixture knob to get a smooth idle. Let the engine warm up
to normal operating temperature. Once warmed up, attempt to set the knob near the center
position (12 o'clock). To do this will most likely require adjustments to the values in the RPM
FUEL chart. If the knob is on the rich side of 12 o'clock, the RPM FUEL values are too low and
vice versa.
Your ECU comes pre-programmed with data that will in most cases, allow the engine to run in
some reasonable fashion. These values will be based on the engine displacement and injector
flow rates which you have provided us with. These are educated guesses so you may have to do a
certain amount of re-programming. If you are unsure of what values to enter, refer to figure
3.
Refer the example maps if you get lost. It will give you an idea of what a good set of values
should look like on a properly mapped engine. A mixture meter hooked to an O2 sensor may help you
in programming your engine.
Once the engine is idling properly, RPM should be the first parameter worked on. Please
note that the sample engine maps are only samples. They show the TRENDS of a properly
mapped engine. If you double the injector size, the RPM values will be halved roughly. Figure 3
gives you the best stating place for RPM FUEL values.
On E and F systems, you must set the MAGNET POSITION parameter as soon as the
engine is idling smoothly before performing any other adjustments. Refer to your E or F
supplement.
RPM, MAP, Fuel Flow, Duty Cycle Concerns
Having both MAP and RPM values over 200 probably indicates that your injectors are too
small or perhaps that fuel delivery to the injectors are insufficient. You can check the duty cycle
slot in gauge 2 mode. At full throttle, the duty cycle should not exceed 85%. When duty cycle
exceeds 100%, the engine will start to run lean. The injectors are too small in this case.
Make certain that the fuel delivery is adequate at full throttle. The engine will not run properly
if fuel flow is insufficient in any part of the system. A fuel pressure gauge is a good idea. Pumps
should be hooked in parallel not series to avoid cavitation.
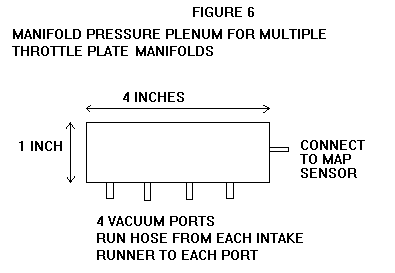
MAP Sensors and Vacuum Sources
The solid state MAP sensor requires a smooth vacuum/pressure signal to relay a proper signal
to the ECU. High amplitude pressure pulsations as you would have when connecting the sensor
to a single runner behind a throttle plate on an independent runner manifold would be
unacceptable. The MAP sensor may function properly on an IR manifold only if all runners are
tapped for a vacuum signal and run into a small common plenum as shown in (Figure 6) leading
to the sensor. If this is not feasible, the TP method of load sensing should be considered.
In gauge mode, if the MAP reading fluctuates a lot at idle, the hose to the sensor may have to
be orificed . A .025 to .035 inch MIG welder tip can be used.
Naturally aspirated engines with small intake plenums and over 300 degrees of camshaft
duration may work better using TP rather than MAP. All turbocharged and supercharged engines
must use the appropriate MAP sensor for load sensing. MAP sensors are available in 1 Bar Ab
for naturally aspirated engines, 2 bar for blown engines up to 15 psi of boost and 3 Bar for
engines running up to 30 psi of boost.
Reset Button
If the LCD programmer is momentarily unplugged, the reset button on the side of the ECU
must be pressed after plugging the programmer back in for proper operation to occur. The
engine should be shut off when pressing reset. If ECU power is off while plugging programmer
back in, the reset button does not need to be pressed.
The reset button is used any time that you wish to reboot the program to its initial position.
This is indicated by SDS EFI in the window. This will appear in the window whenever power
has been interrupted to the ECU or the ECU has performed an automatic reset. Software tells the
ECU to reset automatically if an anomaly occurs or in the case of a program crash.
Pressing the right or left select button will take you into a programming mode.
Shutting off Power and Memory
Switching off power the ECU causes no ill effect for the system or ECU memory. As soon as
you change a value with the programmer, it is permanently changed and stored in memory even
with power off. Power interruption will cause the program to return to SDS EFI just as if the
reset button was pressed.
Injectors
There are basically 3 types of injectors with regards to the flow orifices. One is the pintle style
of which most older Bosch and Nippondenso types are. These have a small tapered spike or
pintle which is pulled back when the magnet windings are energized, thus letting the fuel spray
out. These are very reliable and quite resistant to plugging. We recommend Bosch, Nippondenso
and OEM injectors only.
The second type is the GM/Rochester/MSD ball type. These have slightly better atomization
but are more affected by dirt and varnish. In our experience these do not have the long term
reliability of the pintle style. We specifically do not recommend the use of MSD injectors
2011 or 2012. These injectors are electrically incompatible with our drivers.
The third type is the disc style. These are made by various companies including Bosch/Ford
and Lucas. These are popular in late model applications but also are not as reliable in the long
term as the pintle style.
The second important injector characteristic is the resistance or impedance of the magnet
windings. Low resistance injectors are characterized as peak and hold types. They will have a
winding resistance from 1.7 to 3 ohms. They are opened with a current spike of 2.5 to 4 amps
then held opened with a current of .75 to 2 amps. Injectors with a 2 amp open and .5 amp hold
current cannot be used with our drivers.
High impedance injectors are referred to as a saturated type. Impedance is usually 10 to 16
ohms and they are opened with a sustained current of about 1 amp. Peak and hold injectors open
more quickly at short pulse widths especially so the idle quality with large injectors fitted may
be somewhat better.
Injectors come with various types of noses and fuel fitting ends. Early Bosch and Nippondenso
injectors are available with an 8mm (5/16 in.) Hose barb fuel connection and a 16mm (5/8 in.)
nose barrel. These are sealed with a flat type O-ring. These may use either an internal type
electrical connection or the later type external style plug.
Later Bosch and Nippondenso injectors are identical to the ones above except that they use the
late style electrical plug and an 11mm round O-ring to seal the fuel inlet connection.
The latest style which most modern and aftermarket injectors use, is the so called domestic O-ring style. These use 16mm (5/8 in.) round O-rings to seal both ends of the injector and use the
late style electrical connection.
Toyotas built after about 1989, Subarus and some Nissan products use their own weird
injectors, so beware. When upgrading OE installations with larger injectors, be sure to check
that the O-ring and electrical connections are compatible.
All Bosch injectors are built to very high standards and are very robust. In the injector world,
you get what you pay for- cheap injectors are usually poorly made, are non-linear with pulse
width, won't last or have poor spray patterns. Buy Bosch or Nippondenso and you can't go
wrong.
Don't expect super large injectors to offer a stock type idle or fuel economy. The
maximum size that we recommend for race and performance use is 1.5 times the displacement
of 1 cylinder in cc's per minute. So if you have a 2 liter, 4 cylinder engine with 500cc per
cylinder displacement, the maximum injector size which will idle half decently would be a
750cc/min. injector. If you need more than this, you should consider the staged injector option
which uses 2 injectors per cylinder, one for idle and low speed operation and 2 for high speed
operation.
Fuel Rails
The fuel rail provides a volume of fuel for the injectors and usually serves to hold down the
injectors to the intake manifold. With barb style injectors, separate injector hold downs must be
made but because of the flexibility of the hose, precise alignment to the rail is less important.
With O-ring injectors, all injectors must be at the same depth and be perpendicular to the rail.
Injector to rail spacing is also very critical with O-ring types.
Injector Drivers
SDS injector drivers are externally housed in their own aluminum enclosures. They are
available in 4 or 6 transistor types. Transistors may be triggered in ones, pairs, threes or fours
depending on application. SDS is a non-sequential system like L-Jetronic Bosch systems.
Duty Cycle
Duty cycle refers to the amount of time that the injector remains open in relation to how much
time is available at that rpm before the next injection cycle begins. This is usually expressed in
percent and can be verified in gauge 2 mode under DUTY.
On occasion, very large injectors will cause rough idle problems due to the fact that the
minimum triggering time admits too much fuel. Smaller injectors and/or the staged injection
option are remedies to this problem. In cold climate, larger injectors may aid cold starting.
On constant high power applications such as marine or aircraft use, it is advisable to fit higher
flow injectors than what might normally be used on street driven vehicles. These will limit the
maximum duty cycles and enable the injectors and drivers to run cooler. The maximum
continuous duty cycle should never exceed 70%.
Testing Injector Drivers
Drivers can be tested by disconnecting the input plug from the driver and taking a jumper lead
from the positive battery post and quickly touching it to the DRIVER SIDE of the plug pins. On
most systems, 2 injectors should click when the jumper is touched to each pin. Make sure that
there is power on the red injector harness wire when performing this test.
Staged Injection Option
Staged injection allows your engine to run on one injector per cylinder (or rotor in the case of
Wankel engines) at low load and two injectors at high load. The point of switching is preset and
is non-programmable by the user.
At a predetermined pulse width of 8 milliseconds for example, the primary injector pulse
width would be halved to 4 milliseconds and the secondary injectors would also be brought on
line at 4 milliseconds. As such, no special programming is required.
It is important to have injectors of the same flow rate in both locations so that there is no bump
in the fuel curve. Throttle bodies and intake manifold must be arranged so that air is always
flowing past all of the injectors all of the time.
Injector harnesses are marked for primary and secondary if this is important on a particular
system. On 4 and 6 cylinder staged systems, there will be two driver boxes instead of one and on
Wankels, all systems are staged and use a single driver box.
Optional Fuel Pump Relay
SDS units can be equipped with an optional output to control a relay to switch the fuel pump
off when the engine is not turning over. This feature is designed to prevent the pump from
emptying the tank in a serious accident. The pump relay is energized for 2.8 seconds when
power is turned on to pressurize the fuel rail until the ECU detects crank rotation.
Relay wiring is as follows: pin 30 to chassis ground, pin 85 to switched 12 volts, pin 87 to the
fuel pump negative terminal, pin 86 to orange wire on main harness marked
FPR. The relay switches the ground to the pump so you don't run a ground wire directly to the
pump.
Fast Idle Option
The fast idle option consists of a solenoid valve which connects to the intake manifold via 5/16
vacuum hose and a relay controlled by the ECU via the engine temperature sensor. When the
engine temperature reaches the preset point around 100F, the relay closes the solenoid to allow
normal idle speed. Below this temperature, the solenoid is open bypassing additional air around
the throttle plate. The preset temperature is not user programmable.
Relay connections are as follows: pin 30 to +12 volts, pin 87 to solenoid terminal, pin 86 to
light blue on harness. The solenoid mounting flange must be grounded.
Solenoid connections are as follows: Hose marked PUMP is connected to the intake manifold
with 5/16 vacuum hose. The other port may be connected to the air filter assembly or left open.
If the fast idle rpm is higher than desired, a restrictor can be placed in the other port hose to cut
down the air volume bypassed. The MAP sensor automatically compensates for the extra air
being admitted by the solenoid valve.
RPM Switch Option
The rpm switch control option allows the user to select the rpm where switch is activated. This
option may be used to switch anything rpm dependant on and off especially variable valve
timing and supplemental induction valves.
Wire connections on relay are as follows: pin 85 to +12 volts, pin 86 to purple on main
harness, pin 30 and pin 87 are the switch contacts and need to be connected in series with
the device being controlled.
To program rpm operation, go to the RPM SWITCH ON AT window in the programmer
located to the right of the magnet window. The rpm that you wish to turn the switch on at is
selected with one of the four + or - buttons. Below the rpm that you have selected, the switch is
in the normal or low speed mode (off), when the rpm reaches the selected value, the relay is
activated (on).
Values Lock
This feature allows you to lock out the programmer function to prevent inadvertent changes to
your values. To lock your values, select VALUES LOCK window in the LCD programmer. The
+1 and -1 buttons are used to select it to the ON or OFF position. You cannot program the
system with VALUES LOCK ON selected.
Diagnosing Sensor Problems
The two gauge modes permit monitoring of the primary sensor inputs to the ECU in real-time.
Rpm should be stable, agreeing with the factory tach. Spurious rpm readings usually indicate
ignition or triggering interference.
Manifold pressure should increase as the throttle is opened at a given rpm. On TP systems,
opening the throttle should increase the TP number. The TP number should not change if the
throttle is not moving.
Engine and air temps should roughly agree with the ambient temperature if the engine has
been shut down overnight. Very low temp readings on a warm engine indicate a defective sensor
or a broken connection.
Switching to gauge 2 mode allows you to monitor the mixture knob position. It should read 0
at the straight up position. You should be able to get the reading to change from -49% to +49%
by turning fully to both stops.
Acceleration pump operation is verified by snapping the throttle open. The AP number should
rapidly increase until movement is stopped then the number should rapidly decrease to 0 again.
The AP number should always be 0 unless the throttle is being moved. Rough running and a
fluctuating TP or AP reading without throttle movement indicates a TPS problem usually.
Trouble Shooting
When encountering problems which can be identified to be linked with a specific area or
function, always go to that section in the manual first and re-read it.
Will not start
1. Check programmer. Should display SDS EFI after pressing reset.
2. Check all connections on ECU, driver box, coil, power and grounds.
3. Check fuel pump output.
4. Check for spark.
5. Check injectors for clicking.
Cuts Out at High Power
1. Fuel pump not adequate.
2. Injector flow rate too low.
3. Fuel lines or filter plugged or too small.
4. Check fuel delivery at fuel rail.
5. Engine is crossing an improper value.
6. Fuel pressure too high, injectors won't open.
Not Running on all Cylinders
1. Check each injector for clicking sound.
2. Check plug wires, plugs, drivers.
Cuts out Under Lateral G
1. Fuel pickup problem in tank.
SDS EFI in Window
1. Power has been interrupted or ECU has reset.
2. ECU has reset due to ignition interference. Move sensor wires away from ignition components. Use proper ignition
wires. Check for loose ignition leads. Move ECU further
away from engine.
Strange Symbology or black bars across the top of the LCD window
1. Programmer data being interfered with. Check cord for
damage, tight connections. Press reset button. Could be
caused by ignition interference because of poor plug wires.
Use Magnecor or NGK wires. Check main harness
connection to ECU.
Poor Running, will not Respond
1. Check for leaking fuel pressure regulator diaphragm.
Will not rev up or has Miss
1. Check for bad values in RPM or MAP parameters. Could be crossing
a bad value anywhere.
Erratic idling or running may be due to a poor or incompatible rpm signal to the ECU from the
coil or tachometer lead. By calling up gauge mode you may look for this condition under the
RPM parameter. It will show up as an unsteady reading when the rpm is steady. For example, if
you see the rpm changing from 2000 to 4000 rpm in the window but the actual engine rpm is not
changing, you have this problem. When this happens, extra fuel is dumped in and the engine will
run very roughly as it is too rich.
Switching the green tach wire to a different source such as the tach pickup or negative side of
the coil may solve this problem.
Warranty and Returns
EM-2 is sold for off road use only. New car warranties and emission standards are voided by
installation of this system. Since SDS cannot control the installation or use of its products, we
accept no responsibility for damage, loss or personal injury while using our products. By using
SDS products the user understands and accepts this.
All SDS electronic components are guaranteed to be free from defects in workmanship and
material for a period of 1 year from the date of sale to original purchaser if installed according
to this manual. SDS shall make the sole determination with regards to all warranty claims.
Components are not covered if they have been altered in any way, physically damaged,
subjected to moisture or incorrectly connected.
Defective components will be repaired or replaced as soon as possible at the discretion of
SDS. Prior authorization from SDS is required before any warranty or returned item is accepted.
All returns shall be shipped ONLY by air mail or UPS AIR. No returns are accepted after 30
days and all returned goods are subject to a 15% restocking fee as well as a charge for any
damaged components, cut wires or missing items.
Items shipped to us for warranty checks or testing which are working properly will be subject
to a $40US charge plus shipping.
All SDS software and PCB design is the exclusive property of Simple Digital Systems.
Unauthorized use or reproduction is a violation of copyright.
For Magnecor wires contact:
Magnecor
2550 Oakley Park Road 200
Walled Lake, Michigan 48390
USA
Phone 248-669-6688
For technical assistance contact your dealer or:
Racetech Inc.
G 1007, 55 Ave. NE
Calgary, Alberta, Canada
T2E 6W1
Phone 403-274-0154
Fax 403-274-0556
E-mail racetech@cadvision.com
Website www.sdsefi.com
Version 3.0 Oct. 1998
The E system is an integrated fuel injection and ignition system. Engine spark timing is fully
programmable for both RPM and/or manifold pressure/throttle position. Programming is
done with the standard SDS hand-held programmer.
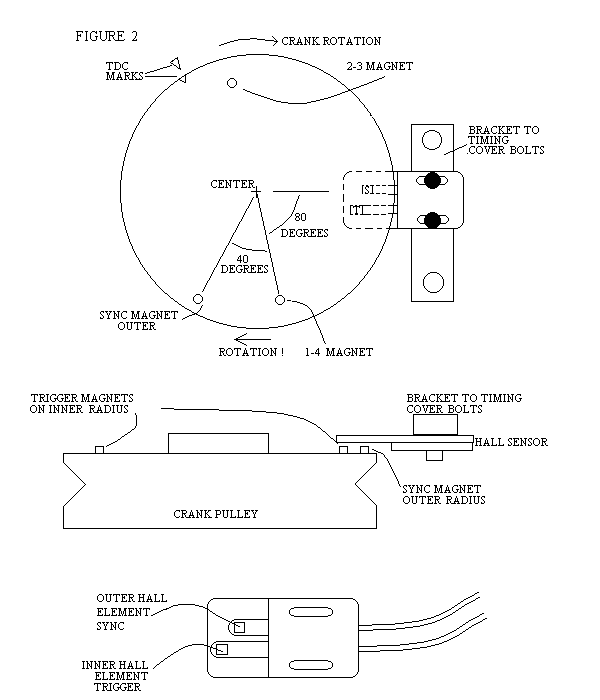
Triggering is accomplished with magnets attached to the crankshaft pulley and a Hall
effect sensor fitted to the timing cover. As such, timing variations relating to belt and chain
deflection or gear harmonics are eliminated. 4 and 6 cylinder EM-2E systems are supplied
with a conventional single coil and special amplifier for use with the OEM distributor to
allow the use of factory type wiring and leads. EM-2E systems for V8 applications require
the use of an MSD CD box described near the end of the manual. Four and 6 cylinder
systems can also be configured for MSD triggering for use in very high output engines.
The SDS ignition system will work on the following applications only at this time; 4
stroke engines with distributors and even firing pulses - 2,4,6 and 8 cylinders.
One triggering magnet is employed for every two cylinders on a four stroke engine.
As each magnet passes the Hall sensor, a pulse is sent to the ECU. The ECU determines the
exact rpm and manifold pressure, sums the programmed spark retard values and calculates
the appropriate delay for the specific conditions at that instant, then triggers the coil to fire at
the precise time.
By setting an initial offset value, the LCD programmer will display the actual ignition
timing in degrees BTDC in real time in gauge 2 mode. Programming can then be
accomplished in the simplest possible terms to understand.
The Hall sensor assembly should be positioned so that the sensor element clears the
crankshaft pulley face by 2 to 3 mm. The sensor may be mounted to face either the front or
the rear of the pulley depending on where the triggering magnets would be best located and
clearance from other interfering items. It is essential to ensure that the Hall assembly bracket
and wires will not touch the fan belt, pulleys or hot engine parts.
The square black sensor element must be placed so that the magnets on the crank pulley spin
over its center with 1 to 3mm clearance. Magnets will protrude about 1 to 1.5 mm past the
pulley face. Usually another bracket must be fabricated to attach to the timing cover bolts in
order that the sensor bracket can be bolted in the proper position. Figure 3 shows a typical
installation. The sensor bracket should be initially positioned in the center of its adjustment
slot to allow maximum movement in or out for final placement once the magnets are in the
pulley. The sensor is supplied with #10-24 Allen bolts. Slot spacing is .625 inch. Use a #25
drill and tap with a 10-24 tap. The sensor must be rigidly mounted on a bracket with no flex.
The wires leading from the sensor should be securely wire- tied every few inches to
avoid vibration breakages. The ECU gets its RPM signal from the Hall sensor on the E unit
instead of the coil as on the D model.
Triggering for the SDS ignition system is accomplished with high performance
magnets mounted in the crankshaft pulley. These magnets must be precisely positioned
both in relation to TDC and each other for proper functioning of the system.
Four cylinder engines use 2 magnets spaced 180 degrees apart, Six cylinders
use 3 magnets spaced 120 degrees apart and eight cylinder engines use 4 magnets arranged
90 degrees apart. See figures 1,2 and 3.
Magnets measure 5mm long and 3mm in diameter. They are mounted in the crank
pulley by drilling holes with a .125(1/8)inch diameter drill bit. This should be done in a drill
press, very carefully, until the correct depth is reached. Hole depth should be 3.5 to 4mm
(.140 to -.160 inch) to allow the magnet to protrude 1 to 1.5mm (.040 to .060 inch) above the
pulley face. The magnets can be mounted on the front or the back face of the pulley
depending on which side is more suitable for magnet and Hall sensor placement. It is
important to ensure that there is sufficient material thickness to drill a 4mm deep hole
without breaking through. The magnets and drilled holes must be free of oil and chips before
gluing the magnets in position with 5 minute epoxy. MAGNETS MUST BE GLUED IN
WITH THE WHITE END FACING OUT. A slight meniscus of epoxy is desirable around
the magnet for best retention, These magnets are usually impossible to remove without
destruction of the pulley and magnets,
Magnets should be positioned as per the following description and figures 1, 2 and 3;
In all cases the crankshaft should be turned until the TDC or 0 mark on the pulley aligns with
the pointer, TDC or 0 mark on the timing cover. With the Hall sensor loosely bolted in
position, a mark should be made on the pulley where the center of the Hall sensor element
intersects the pulley- the FIRST MAGNET should be placed 80 degrees ADVANCED in
the direction of crankshaft rotation- This is best determined using the paper gauge supplied
with your system or a protractor. A line should be marked on the pulley at this position. Now
a centerpunch should be used to mark where the magnet will be placed along this line
making sure that the pulley is thick enough at this location. On multi cylinder 4 stroke
engines, the following procedure must be used:
Once the punch mark is made, the pulley should be scribed all the way around on this
radius using a lathe, compass or dividers. Next, the diameter of this scribed line must be
precisely measured using calipers.
On 4 and 8 cylinder engines, the diameter of the scribed line divided by 1.414 will
give the dimension of 4 equidistant points along this scribed line when using calipers or
dividers. On 4 cylinders, the original mark and the mark 180 degrees from it will be where
the 2 magnets are placed. The other two marks can be ignored.On eight cylinders, all four
marks will be drilled for magnets.
On six cylinder engines, the diameter of the scribed circle multiplied by 3.14 divided
by 3.611 will give the dimension of 3 equidistant points along the scribed circle for magnet
placement. See figures 1, 2 and 3 for clarification. If you are unsure of mounting the
magnets accurately and properly, have the work performed by a qualified machinist.
You must have proper clearance between the magnets and Hall sensor before turning
over the engine. See section above.
A value of between 70 and 90 entered should allow the engine to be started. 80 would be a
good starting point and is where the system is factory set.
STEP 1. Go to RPM IGNITION 1000 and set that value to 10. Also set RPM IGNITION
1250 and RPM IGNITION 1500 to a value of 10. Some 6 and 8 cylinder systems may also
have RPM IGNITION points at 500 and 750 rpm-set these to a value of 10.
STEP 2. Make sure that all IGN RET/MANPRESS values below boost are 0.
STEP 3. Start the engine and keep it running below 1500 rpm.
STEP 4. Connect a timing light.
STEP 5. Change the MAGNET POSITION value until the timing light reads 10 degrees
BTDC.
Once the MAGNET POSITION is set, it does not have to be changed again- it is only to
tell the ECU what the "distance" between the FIRST MAGNET and TDC is. Once the above
5 steps are completed, you may enter your desired timing curve.
Ignition timing requirements differ widely between various types of engines so we can only
offer general guidelines for ignition values. Optimal timing is best found on a dyno or by
driving the car.
For most engines running adequate octane fuel, a simple timing curve using only RPM
offsets often gives excellent results. For high compression, naturally aspirated engines and
turbocharged street engines running relatively low octane fuels and where fuel economy is
important, a more complex curve taking MAP into account may be required. Timing may
have to be retarded at higher manifold pressures to avoid detonation.
Systems not using a MAP sensor will use IGN RET/THROTTLE instead of IGN
RET/MAN PRESS. Here, the throttle position sensor provides load information to the ECU.
RPM values can be changed every 250 and 64 MAP or TP values are available for you to
tailor your ignition curve.
If you have no idea what your ignition curve should look like, programming should be
done by somebody who does, SERIOUS ENGINE DAMAGE CAN OCCUR with
improper values entered. Excessively retarded timing can cause high exhaust gas
temperatures while advanced timing can lead to preignition and detonation.
You should write down what you want your total timing to be with RPM first of all. Most
engines want total timing between 5 and 15 degrees BTDC at idle- As RPM is increased,
total timing is usually slowly increased from 1500 RPM up to 2500 to 4000 RPM- where full
advance is usually in - most engines like 30 to 40 degrees total timing here. Often this figure
is maintained right up to the redline- Figure 4 gives a typical RPM only timing curve along
the lines above. This will work fine on most engines if you are unsure of what values to
enter.
| RPM | TIMING |
|---|
| 1000 | 10 |
| 1250 | 10 |
| 1500 | 13 |
| 1750 | 16 |
| 2000 | 19 |
| 2250 | 22 |
| 2500 | 25 |
| 2750 | 28 |
| 3000 | 30 |
| 3250 | 30 |
| 3500 | 30 |
| 3750 | 30 |
| 4000 | 30 |
| ETC | ETC |
For RPM only ignition mapping, enter 0's in all the IGN RET/MAN PRESS
parameter slots.
For Street turbo engines, the IGN RET/MAN PRESS parameter slots will have to be
used to obtain optimum power and fuel economy running on pump gas.
Some engines may need more ignition advance when cruising to obtain maximum
fuel economy. Since this system only provides for retarding timing with regards to manifold
pressure, a different strategy is needed to effectively get "vacuum advance".
The easiest way to achieve this type of MAP influenced timing curve is to enter a
base value in IGN RET/MAN PRESS of say 5 at all the ranges you don't want to retard or
advance the timing. This will be the base retard value now instead of 0. At the MAP points
that you wish to have total timing "advance", you can enter numbers less than 5. You will
have to compensate for this strategy by increasing the values in the RPM IGNITION ranges
by 5 so the total timing will be correct. At higher MAP values you can enter progressively
larger numbers to pull back total timing under boost or high load if you wish. If you don't
need "advance" under light load cruising conditions, IGN RET/MAN PRESS values Can be
kept at 0 until you want to pull back timing under boost, This is much easier to understand as
well.
It is important to remember that total timing is the result of the RPM IGNITION
value minus the IGN RET/MAN PRESS value at that given instant of engine operation.
Figure 5 shows an example ignition map assuming 35 degrees total timing is optimal
for best power but the octane rating is too low to tolerate this timing under boost. Timing
must be retarded under boost.
FIGURE 5
| RPM | RPM IGN value | RET/MAN PR value at MAP | Total Timing |
|---|
| 1000 | 10 | 0@-15 inches | 10 |
| 1250 | 12 | 0@-10 inches | 12 |
| 1500 | 15 | 0@-5 inches | 15 |
| 1750 | 20 | 0@ 0 | 20 |
| 2000 | 25 | 0@5 psi | 25 |
| 2250 | 30 | 2@7 psi | 28 |
| 2500 | 32 | 3@8 psi | 29 |
| 2750 | 35 | 4@9 psi | 31 |
| 3000 | 35 | 5@10 psi | 30 |
| 3250 | 35 | 6@11 psi | 29 |
| 3500 | 35 | 7@12psi | 28 |
Using this map we would get the following total timing values; 10 degrees at 1000
rpm and -15inches MAP(idle), 35 degrees at 2750 rpm and -5 inches MAP(cruise), 30
degrees at 5000 rpm and 10 psi boost.
There are hundreds of possible timing curves available with SDS to suit any engine, the
previous examples are only hypothetical as mentioned before, efficient timing curves are
best developed on the dyno.
Knock Sensing Option
The knock sensing option allows you to adjust the sensitivity and selectivity of the ECU to
hear knock from the sensor and adjust the amount of ignition retard per knock.
Sensitivity is adjusted with the trim pot screw accessed through the hole in the ECU
marked KN , The amount of spark retard is adjusted using the LCD programmer by calling
up KNOCK RETARD and changing the reference value, A value of 3 will retard the timing 3
degrees for every knock that the ECU hears. Timing returns to the previous value at a
predetermined rate if no more knocks are heard. This rate of return increases with increasing
rpm.
It is important to adjust the sensitivity screw to ensure that the ECU is hearing only
knock and not mechanical engine noise. Many engines go through various harmonics and the
sensor is so sensitive that it can pick up noises which are not detonation and falsely trigger
the sensing circuitry. This may severely retard the timing when in fact no detonation is
present. The sensitivity adjustment allows you to tune out low amplitude noise allowing only
true knock pulses through to the ECU.
This condition is best diagnosed and remedied by first entering a 5 in KNOCK
RETARD and 0's in all the IGN RET/MAN PRESS slots. Set the pot screw in the middle of
its adjustment range. Go to gauge 2 mode. Look at the IGN parameter- Now rev the engine
up to redline in neutral with reasonably small throttle movements if possible. The ignition
timing in the window should follow exactly what you have programmed in the RPM
IGNITION slots. If you see the timing suddenly retard as you are revving the engine, it
means that the knock sensor is picking up mechanical engine noise and the ECU is retarding
the timing because it thinks it is knocking. Turn the pot screw COUNTERCLOCKWISE to
filter out this noise.
You should be able to rev the engine up in neutral without the knock sensor retarding the
timing unless the engine actually knocks. If this happens, there may be too much timing for
the fuel octane that you are using. The sensitivity pot must be set so that the ECU only hears
true knocking and no engine "noise". Remember, clockwise is more sensitive and
counterclockwise is less sensitive. If you can't get satisfactory operation, you may have to try
other knock sensor locations on your engine.
Since every engine is different, try experimenting with different KNOCK RETARD
values. 1 to 5 would be the normal range. The maximum retard that the system can deliver is
20 degrees.
If you wish to negate the knock sensing option, you can enter a 0 in the KNOCK
RETARD parameter. The knock sensing option can take the place of large amounts of
MAP retard in some cases however, total reliance on the sensor while running
unrealistically high amounts of spark timing may lead to running problems, We
recommend using the knock sensor as a safety device rather than a primary timing
control.
Proper location of the sensor and tuning of the sensitivity control along with a proper
KNOCK RETARD value are essential for satisfactory operation of this option. Knock
control is not a magic bullet. If the compression ratio or boost pressure is too high for the
fuel octane you are using, either knock will occur or you will lose power by having to retard
timing to prevent it. Constant hard knocking (detonation) will eventually destroy any engine,
sometimes within seconds.
Mounting the Knock Sensor
We supply a GM sensor for our applications. While other sensors may work with
SDS, our system was designed around the GM unit. We can change a resistor in the ECU to
suit Mitsubishi knock sensors.
The sensor is usually mounted in the block, within 2 inches of the top, close to the
cylinders. It should never be mounted close any obvious noise generating
components such as a fuel pump or camshaft lifters. In most cases, mounting it in the head is
also a poor choice because of valvetrain noise.
A thick area of the block with a boss is the best place to drill a (13mm) .500 inch
hole. The hole should be (13 to 16rnm).500 to .625 inches deep. Make absolutely sure that it
is safe to drill a hole of this dimension where you plan to!
The hole should be tapped with a 9/16 UNF starter tap. Depending on the tap, you
should only go in 4 turns to begin with, clean out the chips and try the sensor for fit. Keep
tapping one turn at a time until the sensor threads in 4 to 5 turns with hand pressure. Stop
tapping when the sensor will screw into the hole 6 to 7 threads with a wrench. Note that the
thread on the knock sensor is a tapered thread.
An alternative to drilling into the block is to machine and thread a steel adapter to
accommodate the sensor on one end and a stub with the thread to match those in an existing
pre-tapped boss in your block, as noted in the previous sections, it may be necessary to
change the sensor location if it is impossible to isolate engine noise while still allowing the
ECU to identify knocking.
Ignition, Coil and Knock Hookups
The Hall sensor cable is plugged into the center 9 pin plug on the ECU, The yellow
wire marked "KS" plugs into the knock sensor. The connections to the coil unit are as
follows; blue from coil amplifier to blue wire on main harness marked "ECU", Green
amplifier wire to coil negative terminal. Black wire to chassis ground- Red amplifier wire to
positive coil terminal, The factory switched +12 volt ignition wire should go to the positive
coil terminal.
Coil placement can be in the stock location in most instances, The coil should never
be bolted directly to the engine. As always, wires should be well supported and routed away
from hot items. The stock coil wire can be plugged into the coil tower. Always use radio
suppression wires of the carbon core or spiral wound variety. NGK or Magnecor wires are
highly recommended. NEVER USE SOLID CORE IGNITION LEADS WITH SDS.
Aligning the Hall Sensor
E systems have a window to the right of gauge mode- The window is available by
pressing the > button while in gauge 2 mode- The LCD Screen will read MAGNET SEEN or
MAGNET NOT SEEN. As a magnet passes the Hall sensor, the graphic will change from
NOT SEEN to SEEN.
Reposition the sensor slightly until the SEEN graphic is displayed with the magnet lined up.
Tighten the sensor bolts. Recheck by turning the crankshaft by hand, As each magnet passes
the sensor, the display should change to SEEN momentarily. This window is only valid when
the crank is turned by hand because the sampling rate of the programmer is too low to
display this parameter with the engine running.
Make sure that there is at least 1mm clearance (2mm on rubber damped pulleys)
between the magnets and the Hall sensor before starting the engine.
Checking the E Coil (4 and 6 Cylinder Units)
If you encounter a no spark situation on a 4 or 6 cylinder E system, check the
following: black wire to ground, +12 volts to + terminal on coil, blue wire marked ECU
plugs into blue wire from harness marked ECU. If there is still no spark, disconnect blue
wire from coil and disconnect main coil lead from the distributor cap placing the end of the
lead about I/4 inch away from a grounded metal object. Now, momentarily touch a jumper
wire from the positive battery post to the blue wire from the coil marked ECU. A strong blue
/ purple spark should jump from the coil wire to ground.
V-8 E System/MSD Triggering
E systems for V-8 applications are slightly different from standard 4 and 6 cylinder E
systems. V-8 units require the use of an MSD 8202 Blaster coil and an MSD 6A (PN 6200)
CD box. This setup permits operation up to 8000 rprn with forced induction. No external
trigger / amplifier box is used on the V-8 System. 4 and 6 cylinder systems can be configured
for the same MSD triggering.
Wire hookups are as follows: blue on main harness marked ECU, to white on MSD
box. MSD box heavy black wire to ground, heavy red to battery positive, thin red to switched
12 volts, thin black wire to coil negative terminal, orange wire to coil positive terminal,
Use the tach terminal on the MSD box to drive your tachometer. The inductive
pickup on the MSD box is not used.
Aligning Rotor With Cap Terminal
To ensure maximum spark intensity and prevent crossfiring, it may be necessary to
align the rotor with the cap terminals.
We recommend fixing the centrifugal advance mechanism and using the following
procedure to align the rotor: Set the crankshaft at 20 degrees BTDC on the number 1
cylinder, now turn the distributor housing until the rotor lines up directly with the number I
cap terminal, tighten distributor clamp. This procedure is usually not as important on most 4
cylinder engines where the rotor width and wide terminal spacing make this less critical
however, on 6 cylinders with small diameter caps and all 8 cylinder engines it may be
necessary
Testing the MSD Box and Blaster Coil
To check the MSD box - make sure that you have +12 volts on both red wires, disconnect the
coil wire from the distributor cap and place the end within 1/4 inch of ground, disconnect the
white MSD wire from the trigger box, momentarily touch the white wire from the MSD to
ground. Spark should jump from the coil wire to ground. To check the coil, check resistance
between the coil terminals with an ohmmeter. Resistance should be .6 ohms.
Ignition Wires
Solid core ignition wires must NEVER be used with SDS units. EMI/RF suppression wires
should always be fitted. We recommend Magnecor or NGK wires for best results.
Troubleshooting
Will not start
1. Check power, ground, blue wire hookup on coil. Test coil.
2. Check Hall sensor alignment.
Miss at high rpm
1. Check Hall sensor alignment.
2. Check Hall sensor air gap.
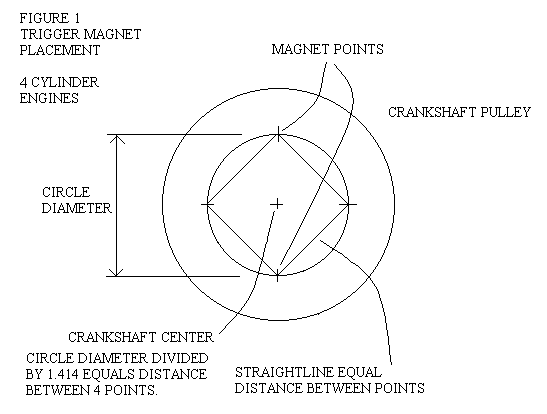
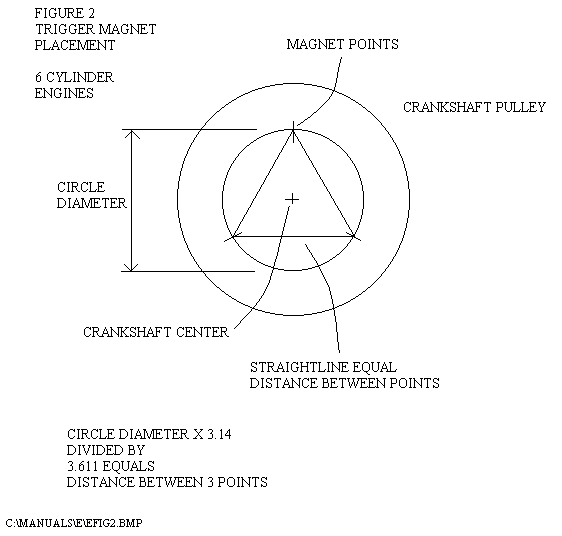

EM-2 F 4 cyl Supplement Version 3.0 Oct. 1998
System Description
The F4 system is an integrated fuel injection and direct fire ignition system designed for 4
cylinder engines. Engine spark timing is fully programmable for both RPM and/or manifold
pressure/throttle position. Programming is done with the standard SDS hand-held
programmer.
Triggering is accomplished with magnets attached to the crankshaft pulley and a Hall
effect sensor fitted to the timing cover. As such, timing variations relating to belt and chain
deflection or gear harmonics are eliminated.
Two, twin discharge GM coils are used.
Applications
The F4 system will work only on 4 cylinder, 4 stroke engines.
Theory of Operation
Two triggering magnets positioned 180 degrees apart are employed plus 1 synch magnet on
a different radius. A double Hall sensor element detects the passage of each magnet and
sends the pulses to the ECU. The ECU determines the exact rpm and manifold pressure,
sums the programmed Spark retard values and calculates the appropriate delay for the
specific conditions at that instant, then triggers the coils to fire at the precise time. The F4
system employs a waste spark strategy where the plugs on two cylinders are fired
simultaneously, 1 on compression and 1 on exhaust.
By setting an initial offset value, MAGNET POSITION, the LCD programmer will
display the actual ignition timing in degrees BTDC in real time in gauge 2 mode.
Programming can then be accomplished in the simplest possible terms to understand.
Mounting the Hall Sensor
The Hall sensor assembly should be positioned so that the sensor element clears the
crankshaft pulley face by 2 to 4 mm (.080 - .160). The sensor may be mounted to face either
the front or the rear of the pulley depending on where the triggering magnets would be best
located and clearance from other interfering items. It is essential to ensure that the Hall
assembly bracket and wires will not touch the fan belt, pulleys or hot engine parts.
The square black sensor elements must be placed so that the magnets on the crank pulley
spin over their centers with 1 to 2mm ( .040 to .080) clearance. Magnets will protrude about
1 to 1.5 mm past the pulley face. Note: on rubber damped harmonic balancers, the
minimum Hall to magnet clearance should be 2.0mm to prevent contact due to pulley
flex. Magnet contact with the Hall sensor will usually destroy the sensor. Always turn
the crank by hand and check clearances before starting the engine.
Note that the longer of the two Hall elements (trigger) is 5mm (.200) further out than the
other one (synch). The longer element will line up with the two trigger magnets spaced 180
degrees apart and the shorter one will line up with the single synch magnet on a 5mm larger
radius on the pulley. Refer to figure 2.
Be certain to mount the sensor on the side of the pulley which is wide enough and thick
enough to contain all 3 magnets. If this is not possible, a different pulley may have to be used
or an aluminum disc can be machined and bolted to the pulley to house the magnets.
Usually, another bracket must be fabricated to attach to the timing cover bolts in order that
the sensor bracket can be bolted in the proper position. Figure 2 shows a typical installation.
The sensor bracket should be initially positioned in the center of its adjustment slot to allow
maximum movement in or out for final placement once the magnets are in the pulley. The
sensor is supplied with #10-24 Allen bolts. Slot spacing is 28mm (1.1 inches). Use a #25 drill
and tap with a 10-24 tap. The sensor must be rigidly mounted on a bracket with no flex.
The wires leading from the sensor should be securely wire- tied every few inches to avoid
vibration breakages. The ECU gets its RPM signal from the Hall sensor on the F unit instead
of the coil as on the D model.
Mounting the Magnets
Triggering for the SDS ignition system is accomplished with high performance magnets
mounted in the crankshaft pulley. These magnets must be precisely positioned both in
relation to TDC and each other for proper functioning of the system.
The F4 system uses 2 magnets spaced 180 degrees apart on the smaller radius for triggering
and 1 synch magnet spaced 40 degrees ADVANCED (past) the first (1-4) trigger magnet.
See figs 1 and 2.
Magnets measure 5mm long and 3mm in diameter. They are mounted in the crank pulley
by drilling holes with a .125(1/8)inch diameter drill bit. This should be done in a drill press,
very carefully, until the correct depth is reached. Hole depth should be 3.5 to 4mm (.140 to
.160 inch) to allow the magnet to protrude 1 to 1.5mm (.040 to .060 inch) above the pulley
face. The magnets can be mounted on the front or the back face of the pulley depending on
which side is more suitable for magnet and Hall sensor placement. It is important to ensure
that there is sufficient material thickness to drill a 4mm deep hole without breaking through
and sufficient face width to allow mounting both sets of magnets.
The magnets and drilled holes must be free of oil and chips before gluing the magnets in
position with 5 minute epoxy. MAGNETS MUST BE GLUED IN WITH THE WHITE
END FACING OUT. A slight meniscus of epoxy is desirable around the magnet for best
retention, These magnets are usually impossible to remove without destruction of the
pulley and magnets so make sure you do this step correctly.
Two circles must be scribed on the pulley face using a lathe, calipers or divider. These
circles must be 5mm (.200) apart and must allow the center of the Hall sensor elements to
intersect these lines. Magnets will be placed along these circles. Draw an arrow with a
marker on the magnet side of the pulley to indicate the direction of pulley rotation. This
is very important to avoid confusion later.
Magnets should be positioned as per the following description and figures 1 and 2. In all
cases, the crankshaft should be turned until the TDC or 0 mark on the pulley aligns with the
pointer, TDC or 0 mark on the timing cover. With the Hall sensor loosely bolted in position,
a mark should be made on the pulley where the center of the inner Hall sensor element
intersects the pulley- From this mark, the first magnet (1-4) should be placed 80 degrees
ADVANCED in the direction of crankshaft rotation. This is best determined using the
paper gauge supplied with your system or a protractor. A line should be marked on the pulley
at this position. Now, a centerpunch should be used to mark where the magnet will be placed
along this line making sure that the pulley is thick enough at this location and that
centerpunch mark lines up with the inner circle to coincide with the trigger element.
Next, the diameter of this scribed circle must be precisely measured using calipers. The
diameter of the scribed circle divided by 1.414 will give the dimension of 4 equidistant
points along the scribed circle when using calipers or dividers. The original mark and the
mark 180 degrees from it(2-3 magnet) will be where the two magnets are placed. The other
two marks can be ignored. See figure 1.
The single synch magnet will be placed along the outer scribed circle. This synch magnet
will be mounted about 40 degrees ADVANCED in the direction of rotation ahead of the
(1-4)trigger magnet. Use the 40 degree paper template supplied or a protractor to locate this
magnet and centerpunch for drilling. If you are unsure of mounting the magnets
accurately and properly, have the work performed by a qualified machinist.
Aligning the Hall Sensor
Exact alignment of the Hall sensor elements with the magnets is critical for proper
operation of the system. Proper alignment can be confirmed by calling up the magnet
alignment mode in the programmer window.
F systems have a window to the right of gauge mode- The window is available by pressing
the > button while in gauge 2 mode- The LCD Screen will read MAGNET SEEN or MAG
NOT SEEN and SYNCH MAG SEEN or NOT SEEN. As a magnet passes the Hall sensor,
the graphic will change from NOT SEEN to SEEN.
Reposition the sensor slightly until the SEEN graphic is displayed with the magnet lined up.
Tighten the sensor bolts. Recheck by turning the crankshaft by hand, As each magnet passes
the sensor, the display should change to SEEN momentarily. This window is only valid
when the crank is turned by hand because the sampling rate of the programmer is too
low to display this parameter with the engine running.
Make sure that there is at least 1mm clearance between the magnets and the Hall
sensor (2.0mm on rubber damped pulleys) before starting the engine. Never attempt to
start the engine until this step has been performed.
Initial Setup - VERY IMPORTANT
This involves calling up the MAGNET POSITION parameter. This step should be
performed as soon as the engine is fired up and idling. Ignition timing is meaningless
without first setting the MAGNET POSITION parameter properly. Note that
MAGNET POSITION and RPM IGN are totally separate parameters.
A value of between 70 and 90 entered should allow the engine to be started. 80 would be a
good starting point and is where the system is factory set.
STEP 1. Go to RPM IGNITION 1000 and set that value to 10. Also set RPM IGNITION
1250 and RPM IGNITION 1500 to a value of 10.
STEP 2. Make sure that all IGN RET/MANPRESS values below boost are 0.
STEP 3. Start the engine and keep it running below 1500 rpm.
STEP 4. Connect a timing light.
STEP 5. Change the MAGNET POSITION value until the timing light reads 10 degrees
BTDC.
NOTE ADVANCE OR DIGITAL DELAY TIMING LIGHTS WILL NOT READ
PROPERLY DUE TO THE WASTE SPARK, SO IT IS BEST TO USE A REGULAR
INDUCTIVE LIGHT.
Once the MAGNET POSITION is set, it does not have to be changed again- it is only to
tell the ECU what the "distance" between the 1-4 MAGNET and TDC is. Once the above 5
steps are completed, you may enter your desired timing curve.
Ignition Programming
Ignition timing requirements differ widely between various types of engines so we can only
offer general guidelines for ignition values. Optimal timing is best found on a dyno or by
driving the car.
With this system, total timing is a result of the RPM IGNITION value minus the IGN
RET/MANPRESS value.
To program ignition timing, two parameters RPM IGN and IGN RET/MAN PRESS
are used. For example, if you want timing at 20 degrees BTDC at 2500 RPM got to RPM
IGNITION 2500 and enter 20. For obtaining ignition retard under boost conditions, by
entering a value under IGN RET/MANPRESS the system will retard timing by the amount
entered at that boost pressure.(See figure 5)
For most engines running adequate octane fuel, a simple timing curve using only RPM
offsets often gives excellent results. For high compression, naturally aspirated engines and
turbocharged street engines running relatively low octane fuels and where fuel economy is
important, a more complex curve taking MAP into account may be required. Timing may
have to be retarded at higher manifold pressures to avoid detonation.
Systems not using a MAP sensor will use IGN RET/THROTTLE instead of IGN
RET/MAN PRESS. Here, the throttle position sensor provides load information to the ECU.
RPM values can be changed every 250 and 64 MAP or TP values are available for you to
tailor your ignition curve.
If you have no idea what your ignition curve should look like, programming should be
done by somebody who does, SERIOUS ENGINE DAMAGE CAN OCCUR with
improper values entered. Excessively retarded timing can cause high exhaust gas
temperatures while advanced timing can lead to preignition and detonation.
You should write down what you want your total timing to be with RPM first of all. Most
engines want total timing between 5 and 15 degrees BTDC at idle- As RPM is increased,
total timing is usually slowly increased from 1500 RPM up to 2500 to 4000 RPM- where full
advance is usually in - most engines like 30 to 40 degrees total timing here. Often this figure
is maintained right up to the redline- Figure 4 gives a typical RPM only timing curve along
the lines above. This will work fine on most engines if you are unsure of what values to
enter.
FIGURE 4
| RPM | TIMING |
|---|
| 1000 | 10 |
| 1250 | 10 |
| 1500 | 13 |
| 1750 | 16 |
| 2000 | 19 |
| 2250 | 22 |
| 2500 | 25 |
| 2750 | 28 |
| 3000 | 30 |
| 3250 | 30 |
| 3500 | 30 |
| 3750 | 30 |
| 4000 | 30 |
| ETC | ETC |
For RPM only ignition mapping, enter 0's in all the IGN RET/ MANPRESS or IGN
RET/THROTTLE parameter slots.
For Street turbo engines, the IGN RET/MANPRESS parameter slots will have to be used to
obtain optimum power and fuel economy running on pump gas.
Some engines may need more ignition advance when cruising to obtain maximum fuel
economy. Since this system only provides for retarding timing with regards to manifold
pressure, a different strategy is needed to effectively get "vacuum advance".
The easiest way to achieve this type of MAP influenced timing curve is to enter a base
value in IGN RET/MANPRESS of say 5 at all the ranges you don't want to retard or advance
the timing. This will be the base retard value now instead of 0. At the MAP points that you
wish to have total timing "advance", you can enter numbers less than 5. You will have to
compensate for this strategy by increasing the values in the RPM IGN ranges by 5 so the total
timing will be correct. At higher MAP values you can enter progressively larger numbers to
pull back total timing under boost or high load if you wish. If you don't need "advance" under
light load cruising conditions, IGN RET/MANPRESS values Can be kept at 0 until you want
to pull back timing under boost, This is much easier to understand as well.
It is important to remember that total timing is the result of the RPM IGN value minus the
IGN RET/MANPRESS value at that given instant of engine operation.
Figure 5 shows an example ignition map assuming 35 degrees total timing is optimal for
best power but the octane rating is too low to tolerate this timing under boost. Timing must
be retarded under boost.
FIGURE 5
| RPM | RPM IGN value | RET/MAN PR value at MAP | Total Timing |
|---|
| 1000 | 10 | 0@-15 inches | 10 |
| 1250 | 12 | 0@-10 inches | 12 |
| 1500 | 15 | 0@-5 inches | 15 |
| 1750 | 20 | 0@ 0 | 20 |
| 2000 | 25 | 0@5 psi | 25 |
| 2250 | 30 | 2@7 psi | 28 |
| 2500 | 32 | 3@8 psi | 29 |
| 2750 | 35 | 4@9 psi | 31 |
| 3000 | 35 | 5@10 psi | 30 |
| 3250 | 35 | 6@11 psi | 29 |
| 3500 | 35 | 7@12psi | 28 |
There are hundreds of possible timing curves available with SDS to suit any engine, the
previous examples are only hypothetical as mentioned before, efficient timing curves are
best developed on the dyno.
Mounting the Knock Sensor
We supply a GM sensor for our applications. While other sensors may work with SDS, our
system was designed around the GM unit. We can sometimes change a resistor in the ECU to
suit other knock sensors.
The sensor is usually mounted in the block, within 2 inches of the top, close to the
cylinders. It should never be mounted close any obvious noise generating
components such as a fuel pump or camshaft lifters. In most cases, mounting it in the head is
also a poor choice because of valvetrain noise.
A thick area of the block with a boss is the best place to drill a (13mm) .500 inch hole. The
hole should be (13 to 16rnm).500 to .625 inches deep. Make absolutely sure that it is safe
to drill a hole of this dimension where you plan to!
The hole should be tapped with a 9/16 UNF starter tap. Depending on the tap, you should
only go in 4 turns to begin with, clean out the chips and try the sensor for fit. Keep tapping
one turn at a time until the sensor threads in 4 to 5 turns with hand pressure. Stop tapping
when the sensor will screw into the hole 6 to 7 threads with a wrench. Note that the thread on
the knock sensor is a tapered thread.
An alternative to drilling into the block is to machine and thread a steel adapter to
accommodate the sensor on one end and a stub with the thread to match those in an existing
pre-tapped boss in your block, as noted in the previous sections, it may be necessary to
change the sensor location if it is impossible to isolate engine noise while still allowing the
ECU to identify knocking.
Knock Sensing Programming
The knock sensing option allows you to adjust the sensitivity and selectivity of the ECU to
hear knock from the sensor and adjust the amount of ignition retard per knock.
Sensitivity is adjusted with the trim pot screw accessed through the hole in the ECU
marked KN , The amount of spark retard is adjusted using the LCD programmer by calling
up KNOCK RETARD and changing the reference value, A value of 3 will retard the timing 3
degrees for every knock that the ECU hears. Timing returns to the previous value at a
predetermined rate if no more knocks are heard. This rate of return increases with increasing
rpm.
It is important to adjust the sensitivity screw to ensure that the ECU is hearing only knock
and not mechanical engine noise. Many engines go through various harmonics and the sensor
is so sensitive that it can pick up noises which are not detonation and falsely trigger the
sensing circuitry. This may severely retard the timing when in fact no detonation is present.
The sensitivity adjustment allows you to tune out low amplitude noise, allowing only true
knock pulses through to the ECU.
This condition is best diagnosed and remedied by first entering a 5 in KNOCK RET and 0's
in all the IGN RET/MANPRESS slots. Set the pot screw in the middle of its adjustment
range. Go to gauge 2 mode. Look at the IGN parameter- Now rev the engine up to redline in
neutral with reasonably small throttle movements if possible. The ignition timing in the
window should follow exactly what you have programmed in the RPM IGN slots. If you see
the timing suddenly retard as you are revving the engine, it means that the knock sensor is
picking up mechanical engine noise and the ECU is retarding the timing because it thinks it
is knocking. Turn the pot screw COUNTERCLOCKWISE to filter out this noise.
You should be able to rev the engine up in neutral without the knock sensor retarding the
timing unless the engine actually knocks. If this happens, there may be too much timing for
the fuel octane that you are using. The sensitivity pot must be set so that the ECU only hears
true knocking and no engine "noise". Remember, clockwise is more sensitive and
counterclockwise is less sensitive. If you can't get satisfactory operation, you may have to try
other knock sensor locations on your engine.
Since every engine is different, try experimenting with different KNOCK RET values. 1 to
5 would be the normal range. The maximum retard that the system can deliver is 20 degrees.
If you wish to negate the knock sensing option, you can enter a 0 in the KNOCK RETARD
parameter. The knock sensing option can take the place of large amounts of MAP retard in
some cases however, total reliance on the sensor while running unrealistically high amounts
of spark timing may lead to running problems. We recommend using the knock sensor as a
safety device rather than a primary timing control.
Proper location of the sensor and tuning of the sensitivity control along with a
proper KNOCK RETARD value are essential for satisfactory operation of this option. Knock
control is not a magic bullet. If the compression ratio or boost pressure is too high for the
fuel octane you are using, either knock will occur or you will lose power by having to
retard timing to prevent it. Constant hard knocking (detonation) will eventually destroy
any engine, sometimes within seconds.
Ignition, Coil, Wire and Knock Hookups
The Hall sensor cable is plugged into the center 9 pin plug on the ECU, The yellow wire
marked "KS" plugs into the knock sensor. The connections to the coil unit are as follows;
Black wire to chassis ground- Red wire to positive switched 12 volts, Green to tachometer
and 2 pin Weatherpack plug to 2 pin plug on main harness.
Coil placement can be in the stock location in most instances, The coil pack should never
be bolted directly to the engine. As always, wires should be well supported and routed away
from hot items.
Never turn over the engine or operate the ignition with the wires disconnected as this
will often damage the coils. Coils damaged in this manner are NOT covered by
warranty.
Ignition Wires
Note that the F4 system will usually require custom wires for fitment to the GM style coils.
NEVER USE SOLID CORE IGNITION LEADS WITH SDS. EMI/RF suppression wires
should always be fitted. We recommend Magnecor wires for best results.
Troubleshooting
Will not start
1. Check power, ground. Test coils.
2. Check Hall sensor alignment.
3. Check MAGNET POSITION parameter and RPM IGN.
Miss at high rpm
1. Check Hall sensor alignment.
2. Check Hall sensor air gap.
Testing The F Coils for spark
To test the F coils, first disconnect the spark plug wires from the 2 coil packs. Now, wrap a
2 inch piece of solder on uninsulated wire around one output terminal on each coil. Position
the ends roughly 1/4 inch from its adjacent terminal on the same coil.
Other wire connections are as follows: Red to +12 volts, Black to ground, Green to tach.
Connect a jumper wire to the positive battery post, then momentarily touch the other end to
the white wire terminal on the 2 pin coil connector. A spark should jump between the coil
terminals on the 1-4 coil. Now, touch the jumper to the black terminal on the 2 pin coil
connector momentarily. A spark should jump between the coil terminals on the 2-3 coil.