EM-3E Supplement
Version 3.2 July 20,00
System Description
The E system is an integrated fuel injection and ignition system. Engine spark timing is fully programmable for both RPM and/or manifold pressure/throttle position. Programming is done with the standard SDS hand-held programmer.
Triggering is accomplished with magnets attached to the crankshaft pulley and a Hall effect sensor fitted to the timing cover. As such, timing variations relating to belt and chain deflection or gear harmonics are eliminated. 4 and 6 cylinder EM-2E systems are supplied with a conventional single coil and special amplifier for use with the OEM distributor to allow the use of factory type wiring and leads. EM-3E systems for V8 applications require the use of an MSD CD box described near the end of the manual. Four and 6 cylinder systems can also be configured for MSD triggering for use in very high output engines.
Applications
The SDS ignition system will work on the following applications only at this time; 4 stroke engines with distributors and even firing pulses - 2,4,6 and 8 cylinders.
Theory of Operation
One triggering magnet is employed for every two cylinders on a four stroke engine. As each magnet passes the Hall sensor, a pulse is sent to the ECU. The ECU determines the exact rpm and manifold pressure, sums the programmed spark retard values and calculates the appropriate delay for the specific conditions at that instant, then triggers the coil to fire at the precise time.
By setting an initial offset value, the LCD programmer will display the actual ignition timing in degrees BTDC in real time in gauge 2 mode. Programming can then be accomplished in the simplest possible terms to understand.
Mounting the Hall Sensor
The Hall sensor assembly should be positioned so that the sensor element clears the crankshaft pulley face by 2 to 3 mm. The sensor may be mounted to face either the front or the rear of the pulley depending on where the triggering magnets would be best located and clearance from other interfering items. It is essential to ensure that the Hall assembly bracket and wires will not touch the fan belt, pulleys or hot engine parts.
The square black sensor element must be placed so that the magnets on the crank pulley spin over its center with 1 to 3mm clearance. Magnets will protrude about 0.5 to 1.0 mm past the pulley face. Usually another bracket must be fabricated to attach to the timing cover bolts in order that the sensor bracket can be bolted in the proper position. Figure 3 shows a typical installation. The sensor bracket should be initially positioned in the center of its adjustment slot to allow maximum movement in or out for final placement once the magnets are in the pulley. The sensor is supplied with #10-24 Allen bolts. Slot spacing is .625 inch. Use a #25 drill and tap with a 10-24 tap. The sensor must be rigidly mounted on a bracket with no flex.
We recommend a minimum clearance between sensor and magnet of 1mm (.040 inch) in the case of solid pulleys and at least 2mm (.080 inch) in the case of rubber damped pulleys.
The wires leading from the sensor should be securely wire- tied every few inches to avoid vibration breakages. The ECU gets its RPM signal from the Hall sensor on the E unit instead of the coil as on the D model.
Mounting the Magnets
Triggering for the SDS ignition system is accomplished with high performance magnets mounted in the crankshaft pulley. These magnets must be precisely positioned both in relation to TDC and each other for proper functioning of the system. The magnets are very easy to chip so handle them carefully. They also stick to anything ferrous, making them easy to lose.
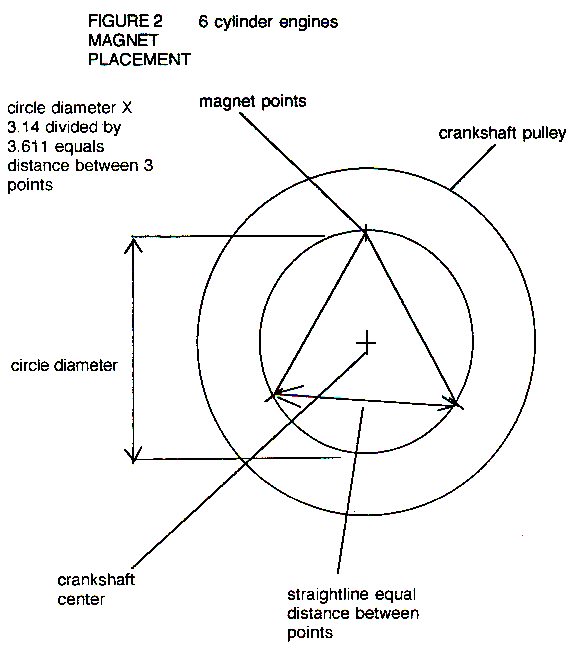
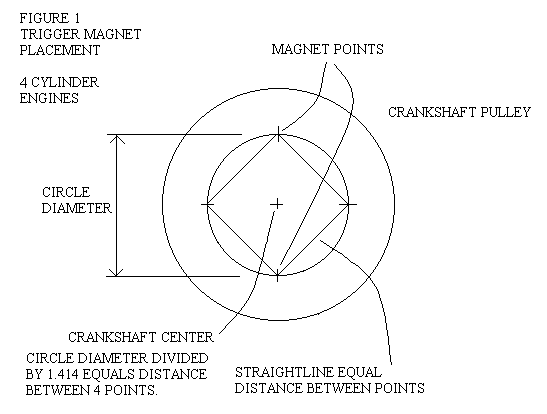
Four cylinder engines use 2 magnets spaced 180 degrees apart, Six cylinders use 3 magnets spaced 120 degrees apart and eight cylinder engines use 4 magnets arranged 90 degrees apart. See figures 1,2 and 3.
Magnets measure 3.5mm long and 3mm in diameter. They are mounted in the crank pulley by drilling holes with a .125(1/8)inch diameter drill bit. This should be done in a drill press, very carefully, until the correct depth is reached. Hole depth should be 2.5 to 3mm (.100 to -.120 inch) to allow the magnet to protrude 1 to 1.5mm (.040 to .060 inch) above the pulley face. The magnets can be mounted on the front or the back face of the pulley depending on which side is more suitable for magnet and Hall sensor placement. It is important to ensure that there is sufficient material thickness to drill a 3mm deep hole without breaking through. The magnets and drilled holes must be free of oil and chips before gluing the magnets in position with 5 minute epoxy. MAGNETS MUST BE GLUED IN WITH THE WHITE END FACING OUT. A slight meniscus of epoxy is desirable around the magnet for best retention, These magnets are usually impossible to remove without destruction of the pulley and magnets,
Magnets should be positioned as per the following description and figures 1, 2 and 3; In all cases the crankshaft should be turned until the TDC or 0 mark on the pulley aligns with the pointer, TDC or 0 mark on the timing cover. With the Hall sensor loosely bolted in position, a mark should be made on the pulley where the center of the Hall sensor element intersects the pulley- the FIRST MAGNET should be placed 80 degrees ADVANCED in the direction of crankshaft rotation- This is best determined using the paper gauge supplied with your system or a protractor. A line should be marked on the pulley at this position. Now a centerpunch should be used to mark where the magnet will be placed along this line making sure that the pulley is thick enough at this location. On multi cylinder 4 stroke engines, the following procedure must be used:
Once the punch mark is made, the pulley should be scribed all the way around on this radius using a lathe, compass or dividers. Next, the diameter of this scribed line must be precisely measured using calipers.
On 4 and 8 cylinder engines, the diameter of the scribed line divided by 1.414 will give the dimension of 4 equidistant points along this scribed line when using calipers or dividers. On 4 cylinders, the original mark and the mark 180 degrees from it will be where the 2 magnets are placed. The other two marks can be ignored. On eight cylinders, all four marks will be drilled for magnets.
On six cylinder engines, the diameter of the scribed circle multiplied by 3.14 divided by 3.611 will give the dimension of 3 equidistant points along the scribed circle for magnet placement. See figures 1, 2 and 3 for clarification. If you are unsure of mounting the magnets accurately and properly, have the work performed by a qualified machinist. You must have proper clearance between the magnets and Hall sensor before turning over the engine. See section above.
Initial Setup - VERY IMPORTANT
This involves calling up the MAGNET POSITION parameter. This step should be performed as soon as the engine is fired up and idling. Ignition timing is meaningless without first setting the MAGNET POSITION parameter properly. Note that MAGNET POSITION and RPM IGN are totally separate parameters.
A value of between 70 and 90 entered should allow the engine to be started. 80 would be a good starting point and is where the system is factory set.
STEP 1. Go to RPM IGNITION 1000 and set that value to 10. Also set RPM IGNITION 1250 and RPM IGNITION 1500 to a value of 10. Some 6 and 8 cylinder systems may also
have RPM IGNITION points at 500 and 750 rpm-set these to a value of 10.
STEP 2. Make sure that all IGN RET/MANPRESS values below boost are 0.
STEP 3. Start the engine and keep it running below 1500 rpm.
STEP 4. Connect a timing light.
STEP 5. Change the MAGNET POSITION value until the timing light reads 10 degrees BTDC.
Once the MAGNET POSITION is set, it does not have to be changed again- it is only to tell the ECU what the "distance" between the FIRST MAGNET and TDC is. Once the above 5 steps are completed, you may enter your desired timing curve.
Ignition Programming
Ignition timing requirements differ widely between various types of engines so we can only offer general guidelines for ignition values. Optimal timing is best found on a dyno or by driving the car.
With this system, total timing is a result of the RPM IGNITION value minus the IGN RET/MANPRESS value.
To program ignition timing, two parameters RPM IGN and IGN RET/MAN PRESS are used. For example, if you want timing at 20 degrees BTDC at 2500 RPM got to RPM IGNITION 2500 and enter 20. For obtaining ignition retard under boost conditions, by entering a value under IGN RET/MANPRESS the system will retard timing by the amount entered at that boost pressure.(See figure 5)
For most engines running adequate octane fuel, a simple timing curve using only RPM offsets often gives excellent results. For high compression, naturally aspirated engines and turbocharged street engines running relatively low octane fuels and where fuel economy is important, a more complex curve taking MAP into account may be required. Timing may have to be retarded at higher manifold pressures to avoid detonation.
Systems not using a MAP sensor will use IGN RET/THROTTLE instead of IGN RET/MAN PRESS. Here, the throttle position sensor provides load information to the ECU. RPM values can be changed every 250 and 64 MAP or TP values are available for you to tailor your ignition curve.
If you have no idea what your ignition curve should look like, programming should be done by somebody who does, SERIOUS ENGINE DAMAGE CAN OCCUR with improper values entered. Excessively retarded timing can cause high exhaust gas temperatures while advanced timing can lead to preignition and detonation.
You should write down what you want your total timing to be with RPM first of all. Most engines want total timing between 5 and 15 degrees BTDC at idle- As RPM is increased, total timing is usually slowly increased from 1500 RPM up to 2500 to 4000 RPM- where full advance is usually in - most engines like 30 to 40 degrees total timing here. Often this figure is maintained right up to the redline- Figure 4 gives a typical RPM only timing curve along the lines above. This will work fine on most engines if you are unsure of what values to enter.
FIGURE 4
RPM TIMING
1000 10
1250 10
I 500 13
1750 16
2000 19
2250 22
2500 25
2750 28
3000 30
3250 30
3500 30
3750 30
4000 30
ETC.
For RPM only ignition mapping, enter 0's in all the IGN RET/MAN PRESS parameter slots.
For Street turbo engines, the IGN RET/MAN PRESS parameter slots will have to be used to obtain optimum power and fuel economy running on pump gas.
Some engines may need more ignition advance when cruising to obtain maximum fuel economy. Since this system only provides for retarding timing with regards to manifold pressure, a different strategy is needed to effectively get "vacuum advance".
The easiest way to achieve this type of MAP influenced timing curve is to enter a base value in IGN RET/MAN PRESS of say 5 at all the ranges you don't want to retard or advance the timing. This will be the base retard value now instead of 0. At the MAP points that you wish to have total timing "advance", you can enter numbers less than 5. You will have to compensate for this strategy by increasing the values in the RPM IGNITION ranges by 5 so the total timing will be correct. At higher MAP values you can enter progressively larger numbers to pull back total timing under boost or high load if you wish. If you don't need "advance" under light load cruising conditions, IGN RET/MAN PRESS values Can be kept at 0 until you want to pull back timing under boost, This is much easier to understand as well.
It is important to remember that total timing is the result of the RPM IGNITION value minus the IGN RET/MAN PRESS value at that given instant of engine operation.
Figure 5 shows an example ignition map assuming 35 degrees total timing is optimal for best power but the octane rating is too low to tolerate this timing under boost. Timing must be retarded under boost.
FIGURE 5
RPM RPM IGN value IGN RET/MAN PRESS Total Timing
1000 10 0@-15 inches 10
1250 12 0@-10 12
1500 15 0@-5 15
1750 20 0@ 0 20
2000 25 0@ 5 psi boost 25
2250 30 2@7 psi 28
2500 32 3@8 psi 29
2750 35 4@9 psi 31
3000 35 5@10 psi 30
3250 35 6@11 psi 29
3500 35 7@12 psi 28
to 7500 35
Using this map we would get the following total timing values; 10 degrees at 1000 rpm and -15inches MAP(idle), 35 degrees at 2750 rpm and -5 inches MAP(cruise), 30 degrees at 5000 rpm and 10 psi boost.
There are hundreds of possible timing curves available with SDS to suit any engine, the previous examples are only hypothetical as mentioned before, efficient timing curves are best developed on the dyno.
Mounting the Knock Sensor
We supply a GM sensor for our applications. While other sensors may work with SDS, our system was designed around the GM unit. We can change a resistor in the ECU to suit Mitsubishi knock sensors.
The sensor is usually mounted in the block, within 2 inches of the top, close to the cylinders. It should never be mounted close any obvious noise generating
components such as a fuel pump or camshaft lifters. In most cases, mounting it in the head is also a poor choice because of valvetrain noise.
A thick area of the block with a boss is the best place to drill a (13mm) .500 inch hole. The hole should be (13 to 16rnm).500 to .625 inches deep. Make absolutely sure that it is safe to drill a hole of this dimension where you plan to!
The hole should be tapped with a 9/16 UNF starter tap. Depending on the tap, you should only go in 4 turns to begin with, clean out the chips and try the sensor for fit. Keep tapping one turn at a time until the sensor threads in 4 to 5 turns with hand pressure. Stop tapping when the sensor will screw into the hole 6 to 7 threads with a wrench. Note that the thread on the knock sensor is a tapered thread.
An alternative to drilling into the block is to machine and thread a steel adapter to accommodate the sensor on one end and a stub with the thread to match those in an existing pre-tapped boss in your block, as noted in the previous sections, it may be necessary to change the sensor location if it is impossible to isolate engine noise while still allowing the ECU to identify knocking.
Knock Sensing Programming
The knock sensing option allows you to adjust the sensitivity and selectivity of the ECU to hear knock from the sensor and adjust the amount of ignition retard per knock.
Sensitivity is adjusted in the KNOCK SENSE window of the LCD programmer. This is adjustable between 1 and 16, with 1 being least sensitive.
The amount of knock spark retard is adjusted using the LCD programmer by calling up KNOCK RETARD and changing the reference value, A value of 3 will retard the timing 3 degrees for every knock that the ECU hears. Timing returns to the previous value at a predetermined rate if no more knocks are heard. This rate of return increases with increasing rpm.
It is important to adjust the sensitivity to ensure that the ECU is hearing only knock and not mechanical engine noise. Many engines go through various harmonics and the sensor is so sensitive that it can pick up noises which are not detonation and falsely trigger the sensing circuitry. This may severely retard the timing when in fact no detonation is present. The sensitivity adjustment allows you to tune out low amplitude noise, allowing only true knock pulses through to the ECU.
This condition is best diagnosed and remedied by first entering a 5 in KNOCK RET and 0's in all the IGN RET/MANPRESS slots. Enter 8 in the KNOCK SENSE window. Go to gauge 2 mode. Look at the IGN parameter- Now rev the engine up to redline in neutral with reasonably small throttle movements if possible. The ignition timing in the window should follow exactly what you have programmed in the RPM IGN slots. If you see the timing suddenly retard as you are revving the engine, it means that the knock sensor is picking up mechanical engine noise and the ECU is retarding the timing because it thinks it is knocking. Decrease the KNOCK SENSE value to filter out this noise.
You should be able to rev the engine up in neutral without the knock sensor retarding the timing unless the engine actually knocks. If this happens, there may be too much timing for the fuel octane that you are using. The sensitivity must be set so that the ECU only hears true knocking and no engine "noise". If you can't get satisfactory operation, you may have to try other knock sensor locations on your engine.
Since every engine is different, try experimenting with different KNOCK RET values. 1 to 5 would be the normal range. The maximum retard that the system can deliver is 20 degrees.
If you wish to negate the knock sensing option, you can enter a 0 in the KNOCK RETARD parameter. The knock sensing option can take the place of large amounts of MAP retard in some cases however, total reliance on the sensor while running unrealistically high amounts of spark timing may lead to running problems. We recommend using the knock sensor as a safety device rather than a primary timing control.
Proper location of the sensor and tuning of the KNOCK SENSE along with a proper KNOCK RETARD value are essential for satisfactory operation of this option. Knock control is not a magic bullet. If the compression ratio or boost pressure is too high for the fuel octane you are using, either knock will occur or you will lose power by having to retard timing to prevent it. Constant hard knocking (detonation) will eventually destroy any engine, sometimes within seconds.
Ignition, Coil and Knock Hookups
The Hall sensor cable is plugged into the center 9 pin plug on the ECU, The yellow wire marked "KS" plugs into the knock sensor. The connections to the coil unit are as follows; blue from coil amplifier to blue wire on main harness marked "ECU", Green amplifier wire to coil negative terminal. Black wire to chassis ground- Red amplifier wire to positive coil terminal, The factory switched +12 volt ignition wire should go to the positive coil terminal.
Coil placement can be in the stock location in most instances, The coil should never be bolted directly to the engine. As always, wires should be well supported and routed away from hot items. The stock coil wire can be plugged into the coil tower. Always use radio suppression wires of the carbon core or spiral wound variety. NGK or Magnecor wires are highly recommended. NEVER USE SOLID CORE IGNITION LEADS WITH SDS.
Aligning the Hall Sensor
E systems have a window to the right of gauge mode- The window is available by pressing the > button while in gauge 2 mode- The LCD Screen will read MAGNET SEEN or MAGNET NOT SEEN. As a magnet passes the Hall sensor, the graphic will change from NOT SEEN to SEEN.
Reposition the sensor slightly until the SEEN graphic is displayed with the magnet lined up. Tighten the sensor bolts. Recheck by turning the crankshaft by hand, As each magnet passes the sensor, the display should change to SEEN momentarily. This window is only valid when the crank is turned by hand because the sampling rate of the programmer is too low to display this parameter with the engine running.
Make sure that there is at least 1mm clearance (2mm on rubber damped pulleys) between the magnets and the Hall sensor before starting the engine.
Checking the E Coil (4 and 6 Cylinder Units)
If you encounter a no spark situation on a 4 or 6 cylinder E system, check the following: black wire to ground, +12 volts to + terminal on coil, blue wire marked ECU plugs into blue wire from harness marked ECU. If there is still no spark, disconnect blue wire from coil and disconnect main coil lead from the distributor cap placing the end of the lead about I/4 inch away from a grounded metal object. Now, momentarily touch a jumper wire from the positive battery post to the blue wire from the coil marked ECU. A strong blue / purple spark should jump from the coil wire to ground.
V-8 E System/MSD Triggering
E systems for V-8 applications are slightly different from standard 4 and 6 cylinder E systems. V-8 units require the use of an MSD 8202 Blaster coil and an MSD 6A (PN 6200) CD box. This setup permits operation up to 8000 rprn with forced induction. No external trigger / amplifier box is used on the V-8 System. 4 and 6 cylinder systems can be configured for the same MSD triggering.
Wire hookups are as follows: blue on main harness marked ECU, to white on MSD box. MSD box heavy black wire to ground, heavy red to battery positive, thin red to switched 12 volts, thin black wire to coil negative terminal, orange wire to coil positive terminal,
Use the tach terminal on the MSD box to drive your tachometer. The inductive pickup on the MSD box is not used.
Aligning Rotor With Cap Terminal
To ensure maximum spark intensity and prevent crossfiring, it may be necessary to align the rotor with the cap terminals.
We recommend fixing the centrifugal advance mechanism and using the following procedure to align the rotor: Set the crankshaft at 20 degrees BTDC on the number 1 cylinder, now turn the distributor housing until the rotor lines up directly with the number I cap terminal, tighten distributor clamp. This procedure is usually not as important on most 4 cylinder engines where the rotor width and wide terminal spacing make this less critical however, on 6 cylinders with small diameter caps and all 8 cylinder engines it may be necessary
Testing the MSD Box and Blaster Coil
To check the MSD box - make sure that you have +12 volts on both red wires, disconnect the coil wire from the distributor cap and place the end within 1/4 inch of ground, disconnect the white MSD wire from the trigger box, momentarily touch the white wire from the MSD to ground. Spark should jump from the coil wire to ground. To check the coil, check resistance between the coil terminals with an ohmmeter. Resistance should be .6 ohms.
Ignition Wires
Solid core ignition wires must NEVER be used with SDS units. EMI/RF suppression wires should always be fitted. We recommend Magnecor or NGK wires for best results.
Troubleshooting
Will not start
1. Check power, ground, blue wire hookup on coil. Test coil.
2. Check Hall sensor alignment.
3. Make sure distributor trigger is not plugged into coil
Miss at high rpm
1. Check Hall sensor alignment.
2. Check Hall sensor air gap.
3. Check plug gap. Reduce to confirm.
Intermittent miss
1. Check rotor phasing.
2. Make sure that Hall cable is not close to high current/voltage wires.