

The first flight took place on Nov. 30/03
Hours to Date- 1905 to build, 180 troubleshooting, Flight hours to date 424.4, Last updates: 10/18/18
02/17/05
The pages on our RV6A document the building, designing, modifying and testing of this aircraft. The information is a result of REAL WORLD testing and learning and is intended to be used as an educational tool. Please feel free to learn from our experiences and use any ideas in your design which appeal to you. If you have questions about what you read, please ask.
RV6A Fuselage
RV6A Tail Surfaces
RV6A Wing
RV6A EJ22 Engine/Propulsion/Mount
Systems
Panel
Canopy
Landing Gear
Cowling
Assembly
Ground Testing/ De-bugging
Flight Testing
Propeller Testing
Performance Testing/ Handling
Trips
Overhaul
Testing, Take 2
Latest comments at bottom of page
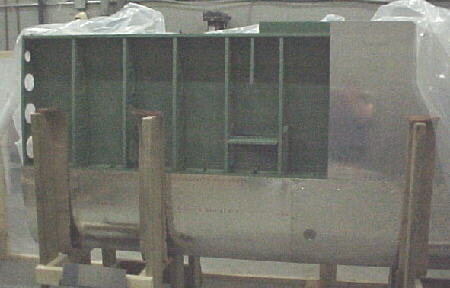
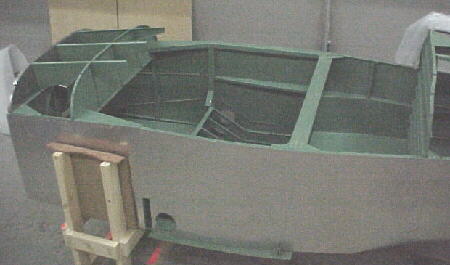 Fuselage
 Wing
Wing
09/18/99 I started cutting metal finally starting with the seat back angles pieces. I figured that this was a good place to start as they are covered up when finished and are relatively non-structual. My tools arrived from Avery and I can only say good things about their friendly and efficient service.
Kit Impressions
The Van's RV6A quickbuild kit has the elevators, ailerons, vertical fin, horizontal stab and flaps completed. The fuselage is skinned on the bottom and sides. The wings are skinned except for the upper outer panel. The fuel tanks are completely built. The stainless firewall is almost completely riveted and very nicely done at that. The fiberglass and welded steel parts are well made. The builder must finish skinning the wings and fuselage, build the rudder and elevator trim tab, mount the control surfaces, install the systems and engine and do all finishing work.
One thing that I quickly noticed was that none of the skins are pre-punched on the quick build kit as they used to be. Van's never made me aware of this either.
The riveting from the factory is safe but not what I would call "show quality", especially aft of the wing spars where there is substantial puckering. Riveting on the spars, stab, fin and control surfaces is quite good. Overall it is better than most Spam cans at least. The fuelage and wing structures are all chromated from the factory. The stab, fin and control surfaces are alodined. Most of the steel parts are either chromated or powder coated which is nice.
I found it very time consuming to inventory the many bags and small parts due to the fact that some did not have numbers nor were things in numerical sequence. A few sheets with line drawings for each part would help identify things but not having numbers on ALL parts was maddening. How is a builder supposed to do inventory on a nameless bracket that he has never seen before?
I have not got into things too far yet, but I find the drawings and manual only satisfactory so far. With several different lengths of the same raw materials, it is unclear about which one you should start cutting up for a particular assembly. On the plus side, the 3 videos supplied were a wealth of knowledge and help visualize the construction process. They also offer some very useful tips and alternate construction methods on certain assemblies to save time and do a better job. More black and white photos of each assembly in the manual would be an asset.
Van's service seems to be efficient but slow due to their massive backlog. This is the price of being so successful in the marketplace. One item of note with the Van's kits- ALL kits require the finishing kit. Van's website and sales literature are VERY unclear on this point in my opinion. I E-mailed Van's before I ordered the kit to clarify the point and asked if the finishing kit was required when ordering the quickbuild and their answer was no. I was surprised when only 2 large crates arrived rather than the expected 3. Now I must wait another 4 months for the finishing kit to arrive and pay another $4500. This did not make me too happy after asking them specifically about this concern.
I finally received my finishing kit. I was very impressed with the steel fabrication and welding on the canopy frame, roll bar and engine mount. Absolutely top notch work. I will be building a new mount to suit the Subaru engine so I will have a a brand new dynafocal mount for sale sometime in the future if anyone is interested. The fiberglass parts are OK but will need some serious work to make fit well. After some measuring, I decided that my original plan to use a single rad mounted behind the oil pan will not work. Looks like I will be mounting twin rads a few inches back from the stock inlets and build some new outlet ducts on the sides of the cowling so this will save a lot of cowl reshaping as originally planned.
29/04/01 Impressions at the 1000 hour mark
Well first of all, I have learned a lot! Building the RV has been a very educational experience. My experience with Van's Aircraft has been mostly positive and they are helpful and timely with their responses. On a less positive note, the manual and plans are poor in my view. There are just too many errors on the drawings and a serious lack of detail, organization and photos in the manual. Fortunately, Van's seems to have addressed many of these concerns in the RV8 and RV9 with proper CAD plans and even better in the new RV7 with CAD plans and CNC pre-punched parts, a quantum leap forward. I have yet to see the latest manuals but hopefully these are improved as well.
Recommendations for people considering an RV? Don't underestimate the task of building an aircraft. This is a HUGE task. You will require lots of drive to keep at it. If you have little mechanical aptitude or experience, chances are that you will never complete it. For the few thousand extra dollars, BUY THE QUICKBUILD KIT. This will save you at least 1000 hours and much frustration. In a recent magazine article it was said that you could have an RV9 flying for $30,000US. This is absurd unless you get a free engine, paint, avionics and already have all the tools to build it. Realistically, count on $50,000 to $75,000US depending on engine and avionics choices. This is cheap for the performance that you get compared to factory spam cans.
As far as the factory workmanship on my kit goes, I'd dispute claims that you can build an Oshkosh show winner from mine. Some of the riveting is not great. Safe but not great. Some of the parts alignment is not great either. Much of this is non-critical and is covered up when the plane is completed but it is still there. Work on the wing is ok, fuselage is ok, stab and fin is excellent, control surfaces is good, welded components is excellent, fiberglass is ok.
Would I build another one? I would never build a non-quickbuild kit. I would not build another quickbuild kit of my vintage either as it has been a frustating experience much of the time due to the poor plans and manual. I would build one of the new quickbuilds as I believe that they are probably one of the best kits and best values on the market now. My hat is off to anyone who finishes a non-quickbuild RV. One more comment. Van's points out that 10,000 kits have been sold and 2500 are flying making the RVs probably the most successful kit design of all time, however this means that 7500 are still uncompleted. Much of this is due to the huge task of building any aircraft but some can be linked to the less than ideal plans and manual. The frustration of these can make even the determined give up. I suspect that of the 10,000 kits out there, 5000 will never fly.
06/08/01
I have placed several small orders with Van's for missing parts. Although they have made some errors in shipping the wrong parts sometimes, recently I have always received the parts within 5 days of faxing my order in. If they screw up, they always make it right ASAP at their expense. I am quite happy with their service.
09/08/01
I had the pre-cover inspection performed on Sept. 6 by the MD RA representative. Only one problem was found, the four nuts holding the center elevator hinge to the stab did not have enough threads showing to be properly in safety. This was done by Van's so I don't feel too bad. Onwards and upwards.
10/10/02
The first parts were shipped off to Klarenbach Aviation for painting today. A big milestone!
11/21/02
I ordered some parts from Van's and had them the next day. Excellent service!
I have some parts left over from my kit which I won't be using. Make me an offer:
RV6A cowling air inlet fiberglass parts PN 0365 and 0360.
Capacitance fuel quantity kit
Stainless firewall recess panel PN F601K
Two Landing light kits PN LLDW01
9" spinner front plate PN S-403
11" spinner front plate PN S-605, holes drilled to 1/2"
11/30/03
First flight.
Here are some videos of our RV6A flying:
 http://www.youtube.com/watch?v=kjNsbU6nFAw
http://www.youtube.com/watch?v=44HbwRm8lHw
http://www.youtube.com/watch?v=bOTmwnhGy6A
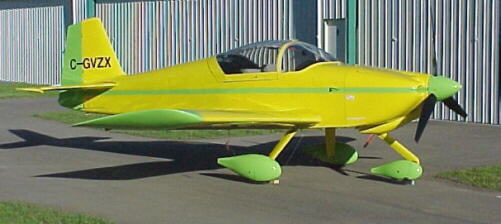
Racetech RV6A Specifications
Wingspan- 23 feet
Length- 20 feet
Height- 6.66 feet
Wing Area- 110 square feet
Empty Weight- 1179 lbs.
Gross Weight- 1750 lbs.
Useful Load- 614 lbs.
Wing Loading- 15.9 lbs./ square foot
Power loading- 10.3 lbs./ HP
Fuel Capacity- 38 US gallons
Baggage Capacity- 100 lbs.
Powerplant- Subaru EJ22T. Liquid cooled, horizontally opposed 4 cylinder, 2200cc, turbocharged, fuel injected, intercooled. 170 hp at 4600 rpm and 38 inches MAP.
Engine Management System- SDS EM-4 4F, programmable, digital fuel and ignition control, driving four Bosch 390cc/min. injectors and twin, waste spark GM, direct fire coils.
Reduction Drive- Marcotte M-300-VP, internal helical gear, 2.2 to 1 ratio.
Propeller- IVO 3 blade Magnum composite, 76 inch diameter, electrically adjustable 45-105 inch pitch range.
Turbocharger- Garrett T3/ TO4E, -50 compressor, Stage III .82 A/R turbine, integral wastegate.
Performance
Cruise speed 75% power, 15,000 feet- 160 knots TAS
Maximum speed, 15,000 feet- 181 knots TAS
Climb rate, gross weight- 1200 ft./ min.
Climb rate, 1400 lbs.- 2200 ft./ min.
Range 75%, 12,000 feet with reserves- 500 naut. miles
Range 55%, 12,000 feet with reserves- 600 naut. miles
Service ceiling EST., 1400 lbs.- 30,000 feet